“Good teaching is more a giving of right questions than a giving of right answers.” – Josef Albers, educator & artist
Have you ever wondered why your learners can retain information only for a short time? Or do you often need help with assessing their knowledge retention?
Well, it can be because you need to create online tests and assign them to your learners right after teaching them a topic.
An online test is a valuable method for assessing learners’ retention, gaps, and challenges. That said, it can be daunting if you’re doing it for the first time or, most importantly, if you aren’t using the right online test software.
Not any more!
You’re closer to creating the first online tests for your employees or students than you think.
How?
This guide walks you through the nuances of how to make online tests, best practices for test creation, what benefits online test makers provide, how to choose the best solution, and more.
Continue reading to find out.
Watch: How to Create online test or Exams
What Are Online Tests?
Online tests are tests conducted online as a part of employee training evaluations or student assessments. Online quizzes are the best example of these tests. You can use them as end-of-chapter or end-of-course assessments to determine knowledge retention and gaps.
Unlike traditional online assessment methods, online tests let participants attempt these on-screen assessments on a PC, smartphone, laptop, or tablet from anywhere and at any time. All they need is a stable internet connection.
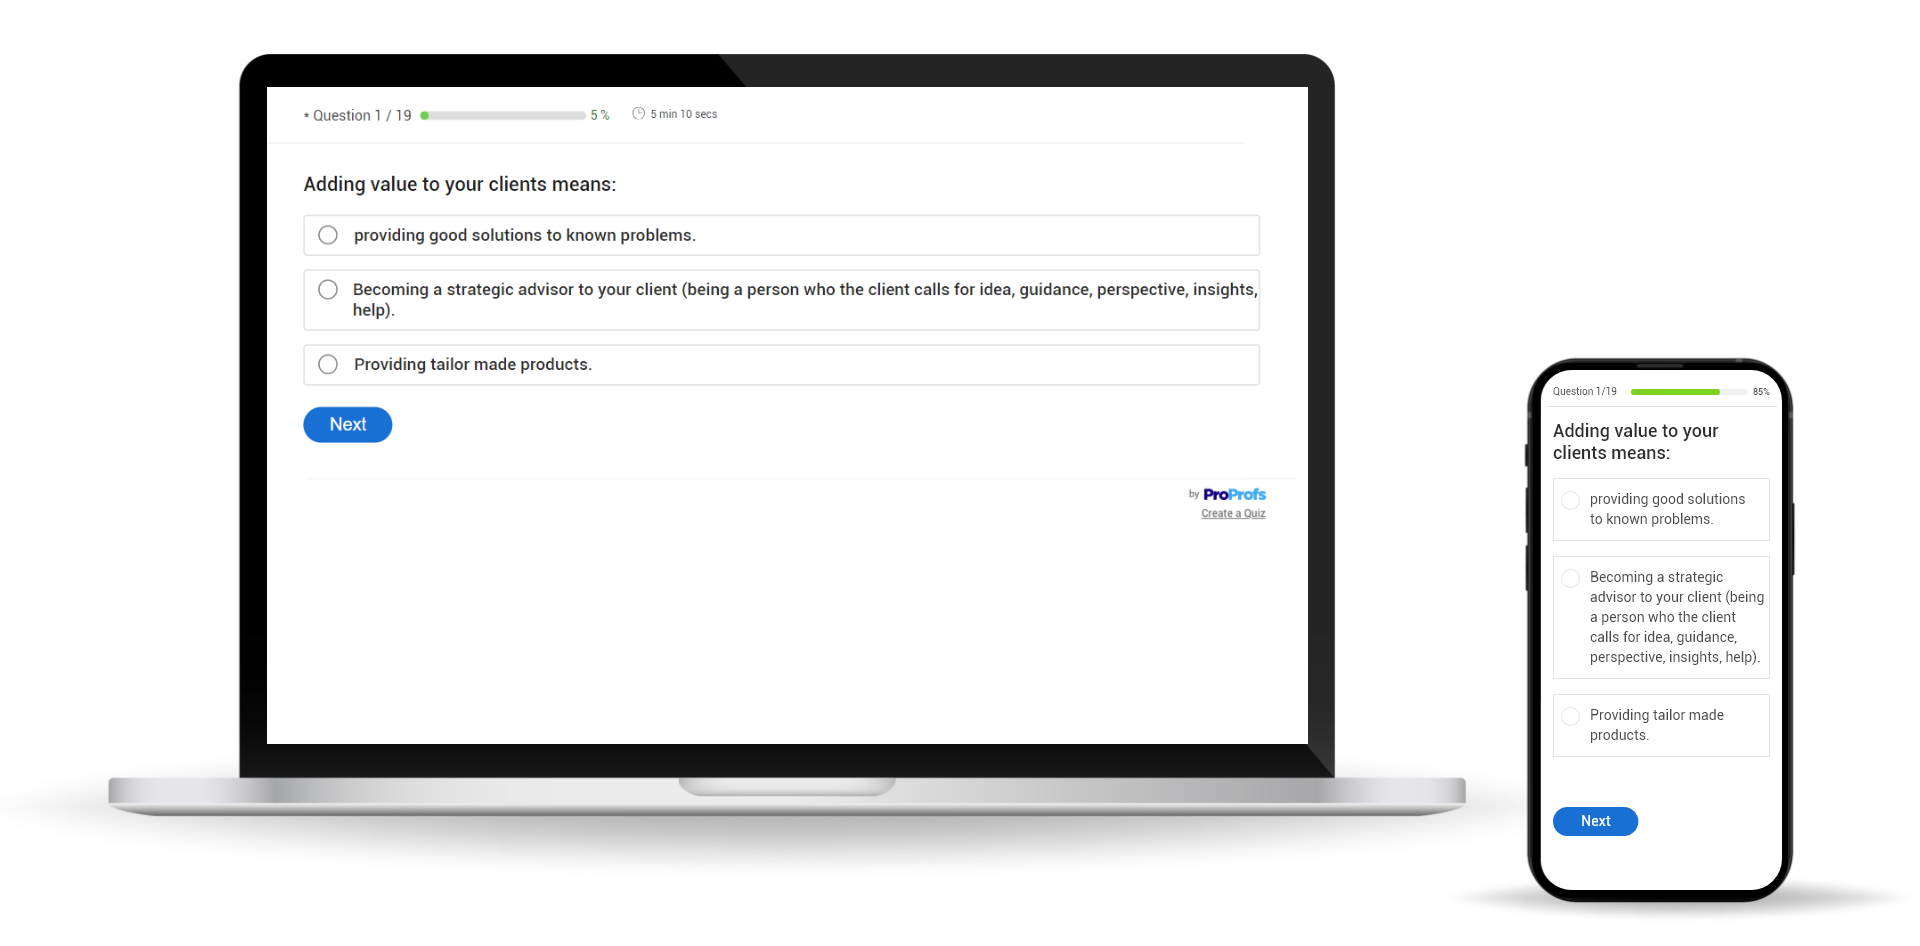
Generally, training managers and teachers rely on test maker software to create, manage, share, track, and analyze online tests, exams, and assessments.
What Makes an Online Test Impactful?
All effective online tests share some common traits that make them sustainable and successful in the long run. Check out the following to get an idea:
Perfect Alignment Between Questions & Learning Objectives
Every online test you conduct should align with your learning goals. For example, if your students are preparing for a Scholastic Aptitude Test (SAT) or American College Testing (ACT), then your tests should follow the question format of these tests. That will make testing more meaningful and useful to learners.
Matching Difficulty Level
Similarly, the mock online tests you conducted should have the same difficulty level as the real tests or exams. This will prepare your students for the actual assessments better and they will never be taken by surprise.
Personalized Experiences
Like choosing the same question format and difficulty level, offering custom quizzing experiences is a must. It can be the look and feel of your assessment with branding, need-based tests, or how you display results at the end of a test.
A Variety of Question Types
When you use mixed question types, it makes your online tests more interesting and engaging. You can utilize all the popular question types, such as multiple-choice, true or false, matching, dropdown, and audio/video responses.
Integrity of Tests
Like damage or defect-free consumer products, an online test should be error-free. It shouldn’t show any silly mistakes or oversights in how you create online tests and set the questions. Such tests are supposed to be credible. Work closely with your stakeholders to create perfect tests.
Honest Feedback
Lastly, unbiased and honest feedback to your learners about their achievements and improvement areas is a must for effective online tests. They should get the real takeaways after sitting for a test. An in-depth analysis of test results can help you gain insights into different performance areas and share the same with your test takers.
How to Create Online Tests for Students or Employees
The process of creating engaging online tests is easy, whether they are meant for students or professionals. You just need to follow a few simple steps. We’ve used Quiz Maker as an example here to demonstrate how it works in the application.
Step 1: Choose a Template or Create from Scratch
The first step to creating an online test, whether online employment tests or tests for students, is two-fold: you can use a template or create from the ground up.
Using a professionally designed template is the easiest and quickest way to create online tests. These templates are often fully customizable and provide well-researched questions and popular formats.
To pick a template of your choice, click create a quiz on your quiz dashboard and then on Create Scored Quiz. There, you’ll discover a collection of 100+ scored quiz templates to choose from for your online tests.
Next, click the template you wish to use, preview it, and click Use This Template to select the template.
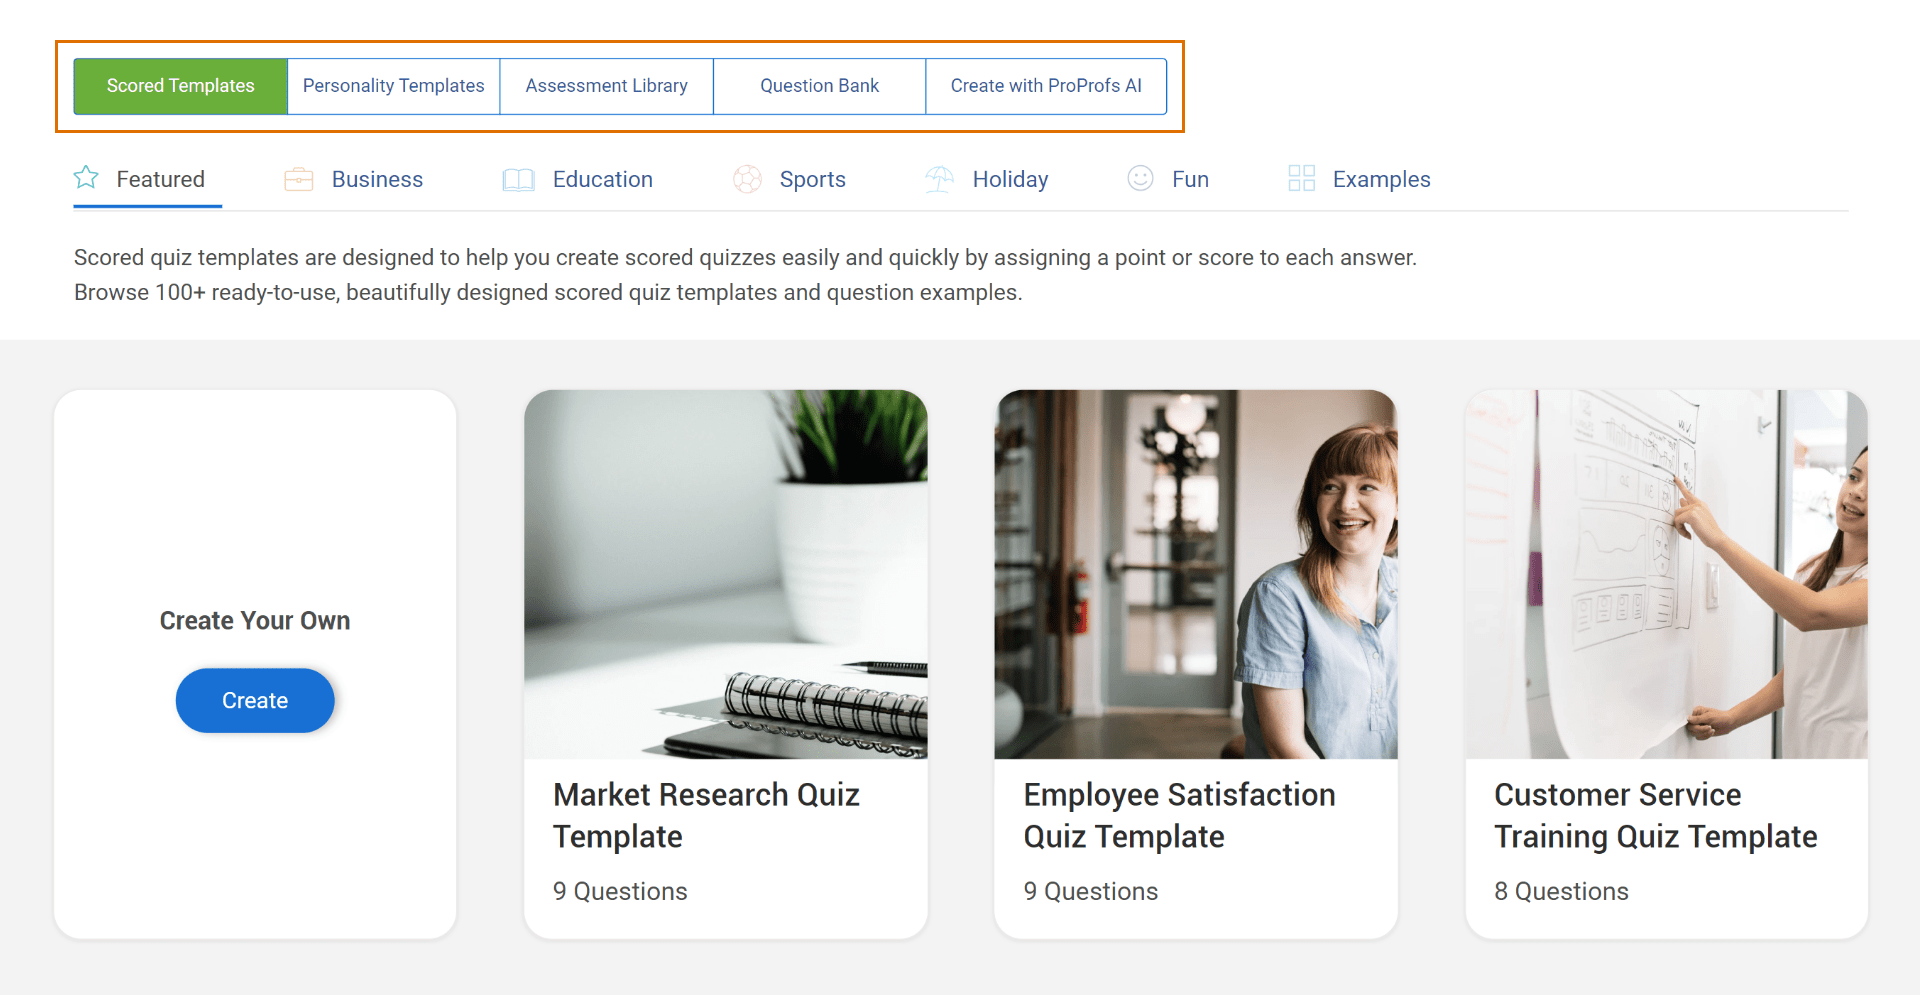
If you don’t find a suitable template or wish to be creative, you can create a test from scratch.
To make a quiz from scratch, click +Create from Scratch and start building your quiz by taking the following additional steps.
Step 2: Add Questions
On the right side of your interface, locate and click the +New Question button.
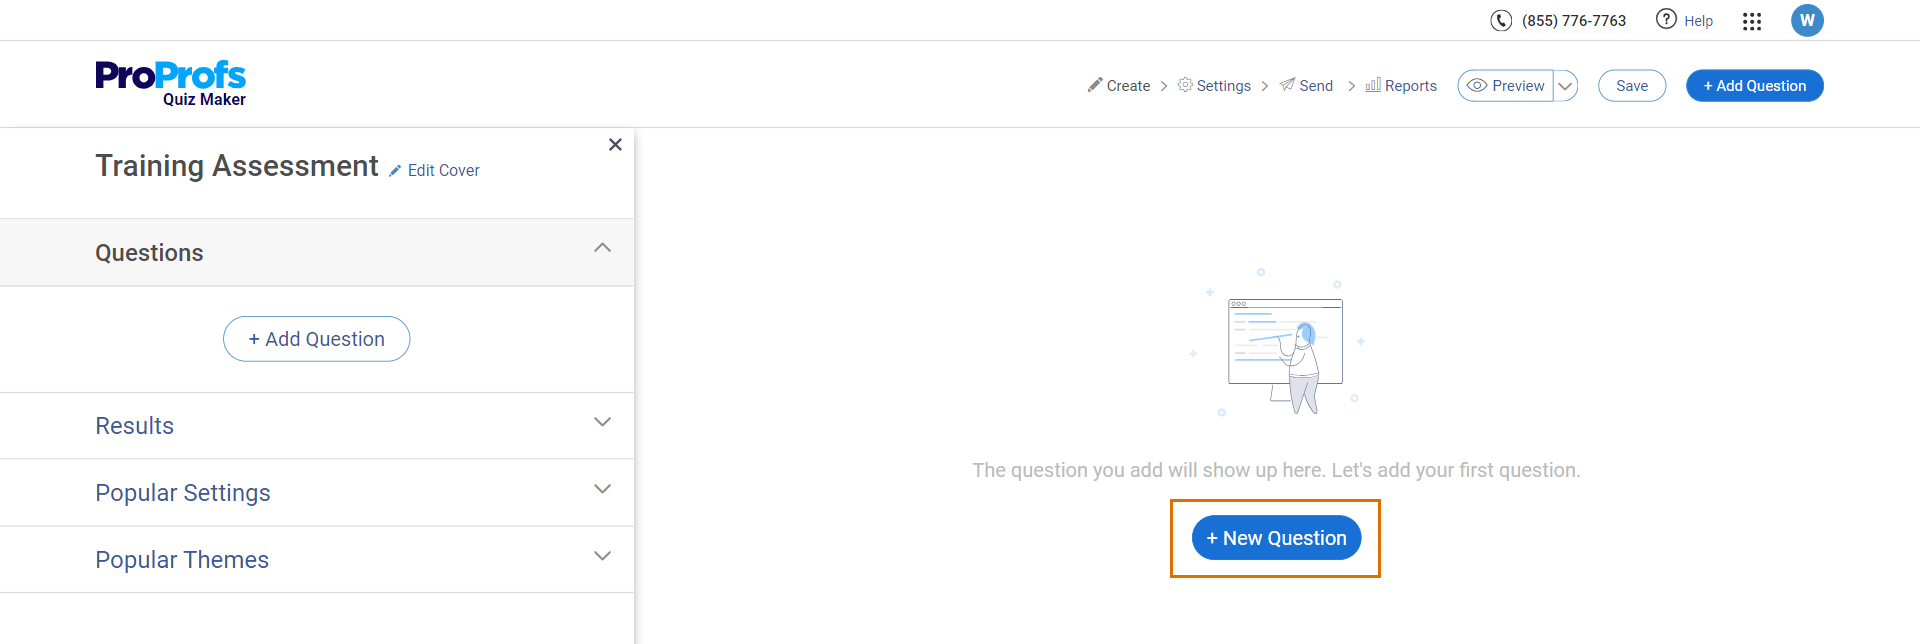
Here, you can view the list of 10+ available question types and start adding them.
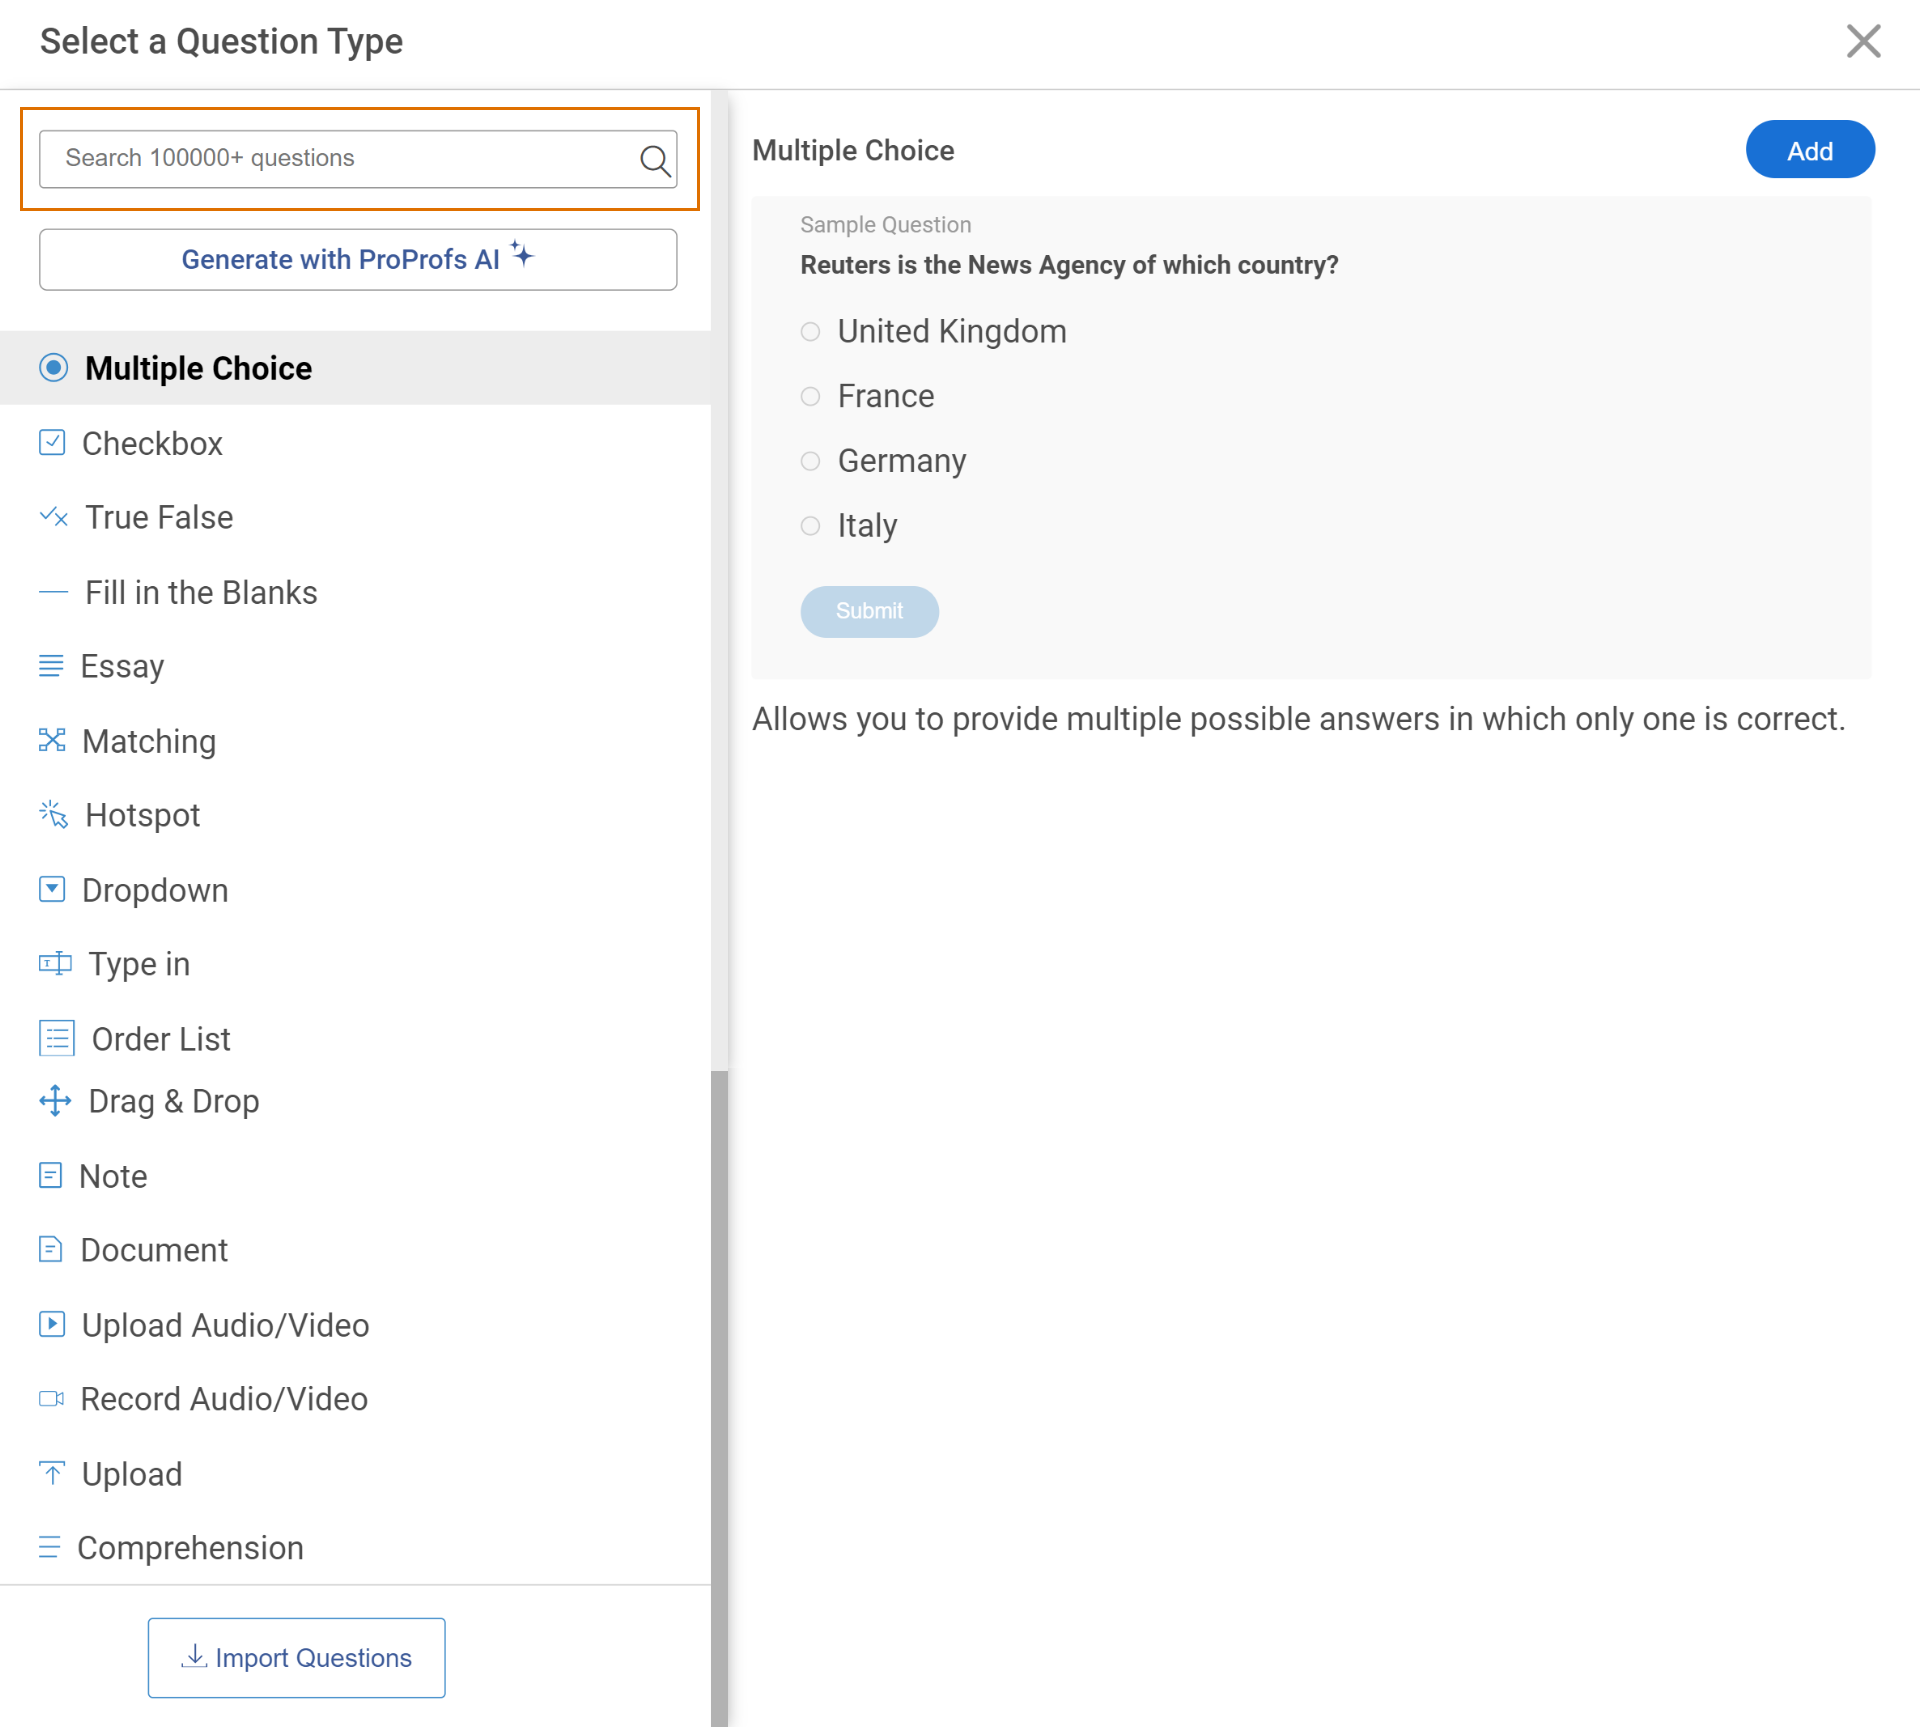
You can create your own questions, add questions from the question bank, or import questions from any previous test you’ve created.
To get ready-to-use questions, simply type your test topic in the search bar at the top left corner of the window and choose from the search results that appear.
Watch: How to Create a Quiz Using Question Bank & Templates
To create questions using AI, simply click the “Generate with ProProfs AI” button. Enter a few basic details, and you can create an online test ready in seconds!
You can customize the difficulty level and format of the questions and even generate detailed answer explanations if desired. It’s that easy!
Step 3: Assign Scoring & Feedback
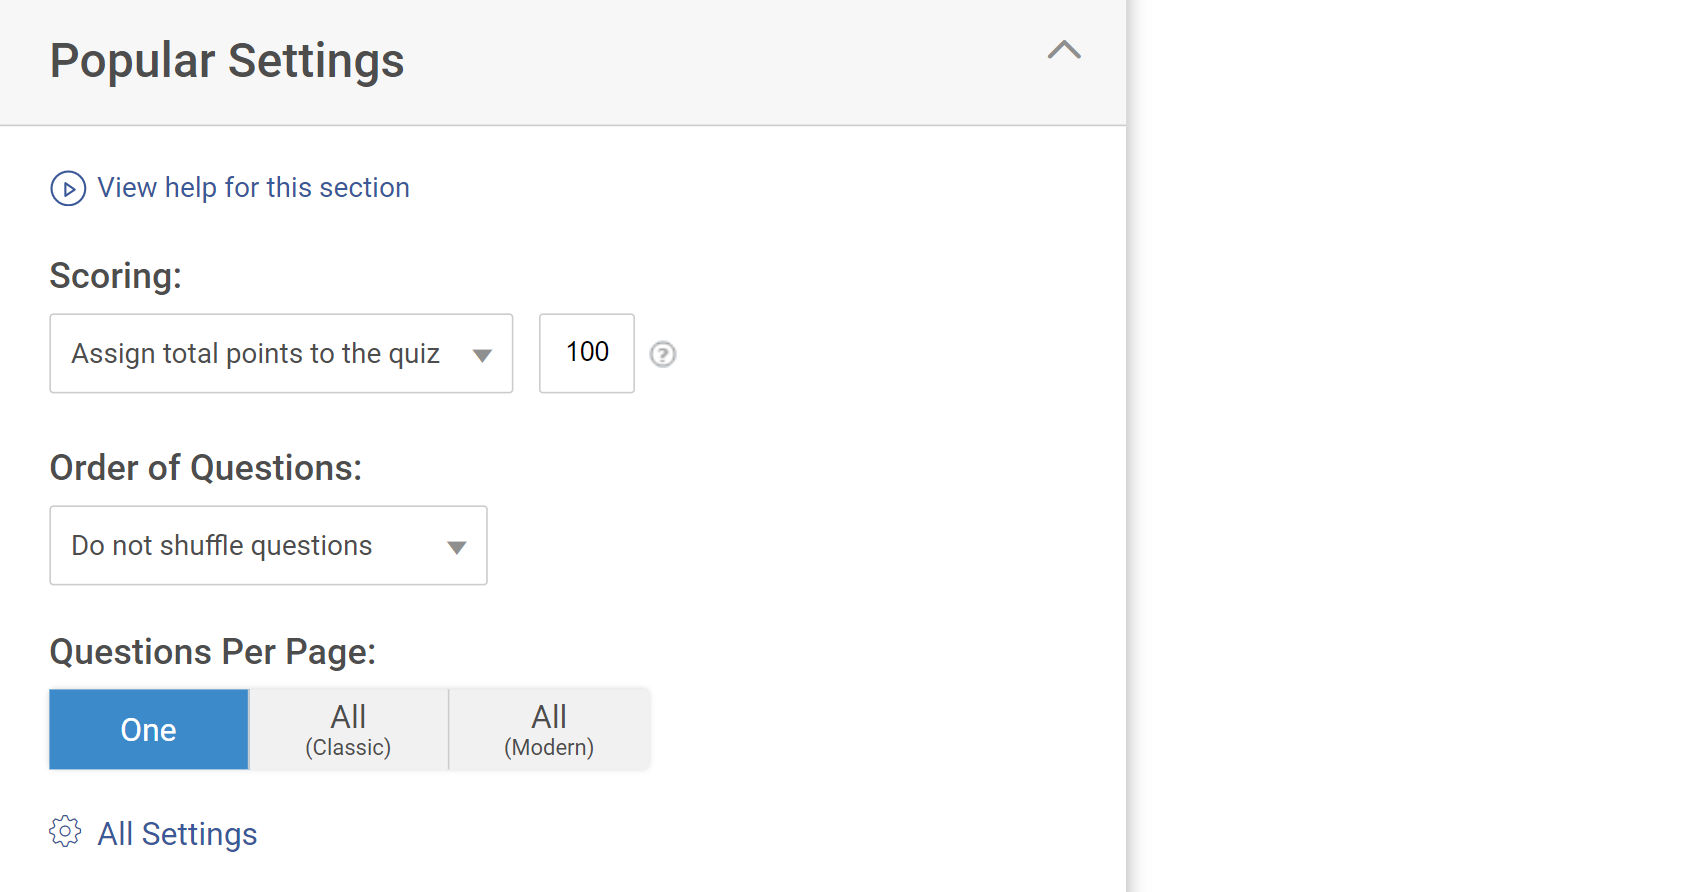
After you’ve added questions to your quiz, assign scores to the correct answers to enable automated grading.
To assign scores, locate Popular Settings, open the dropdown menu, and select how you want to assign scores to your questions.
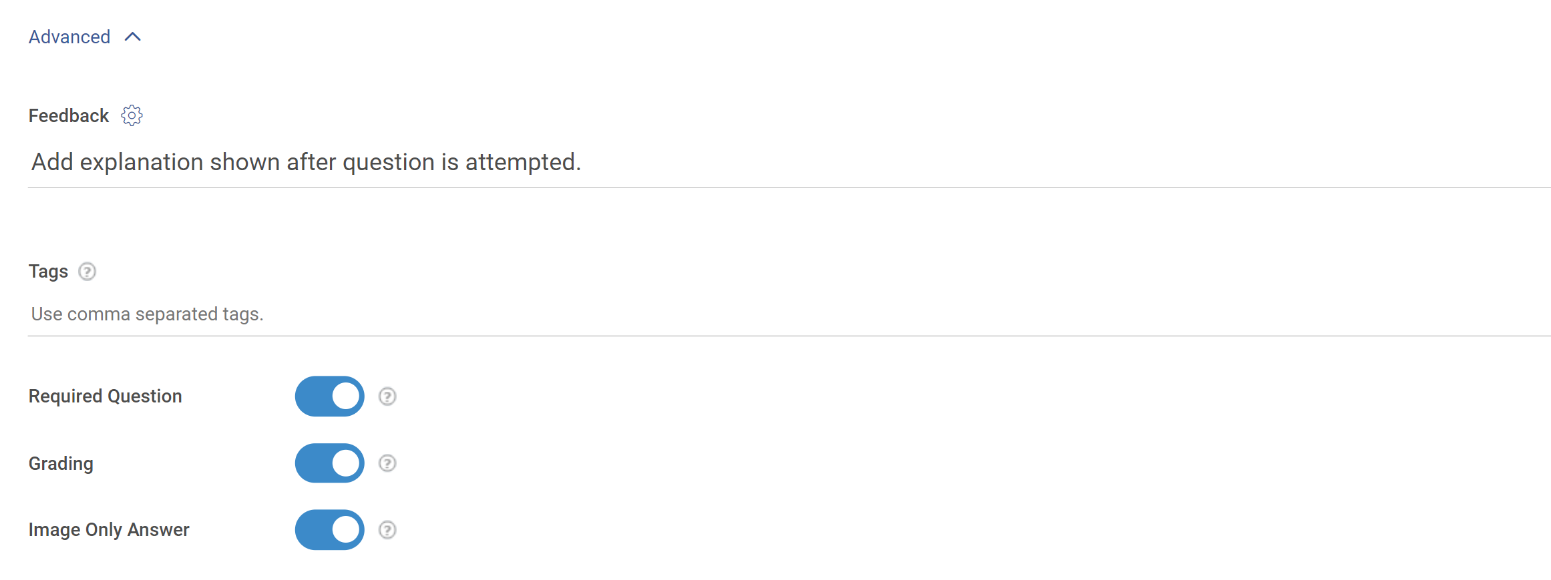
Similarly, assign feedback that you want to share with your learners at the end of a test.
To add feedback, click Advanced at the bottom of your question, and in the space provided, type the feedback for the answer.
Step 4: Create Test Results
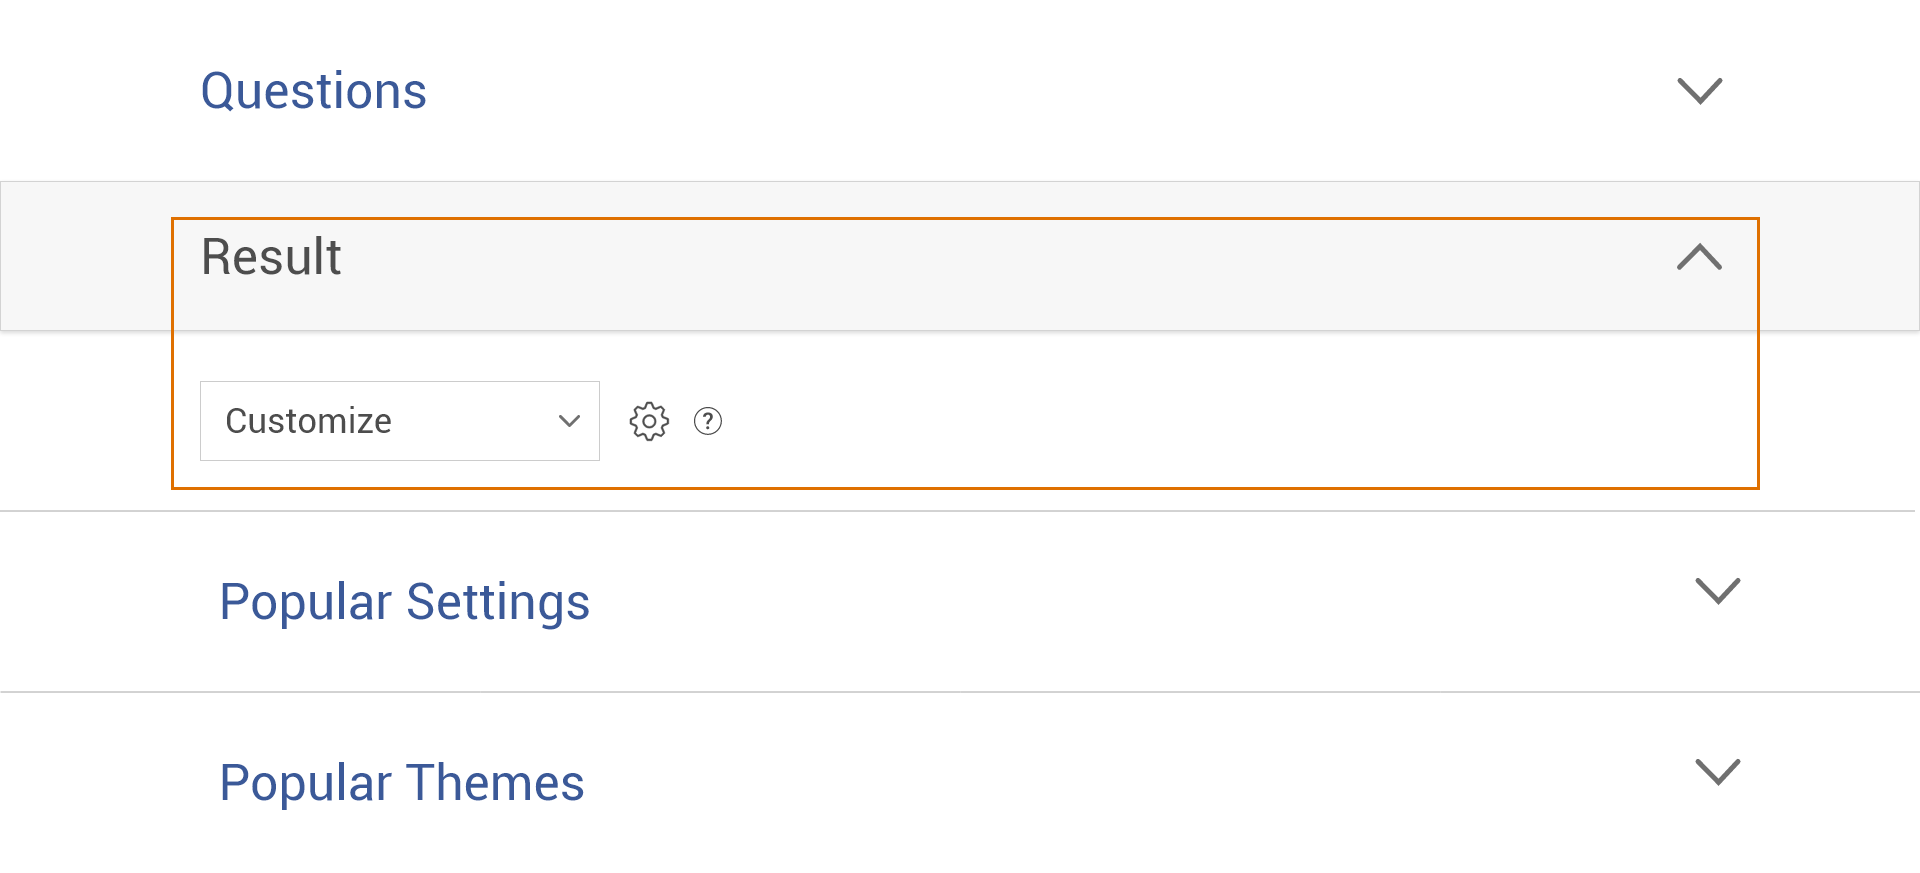
The next step is to choose the type of result. For that, click Results located on the left of your interface. From the dropdown menu, choose a result type.
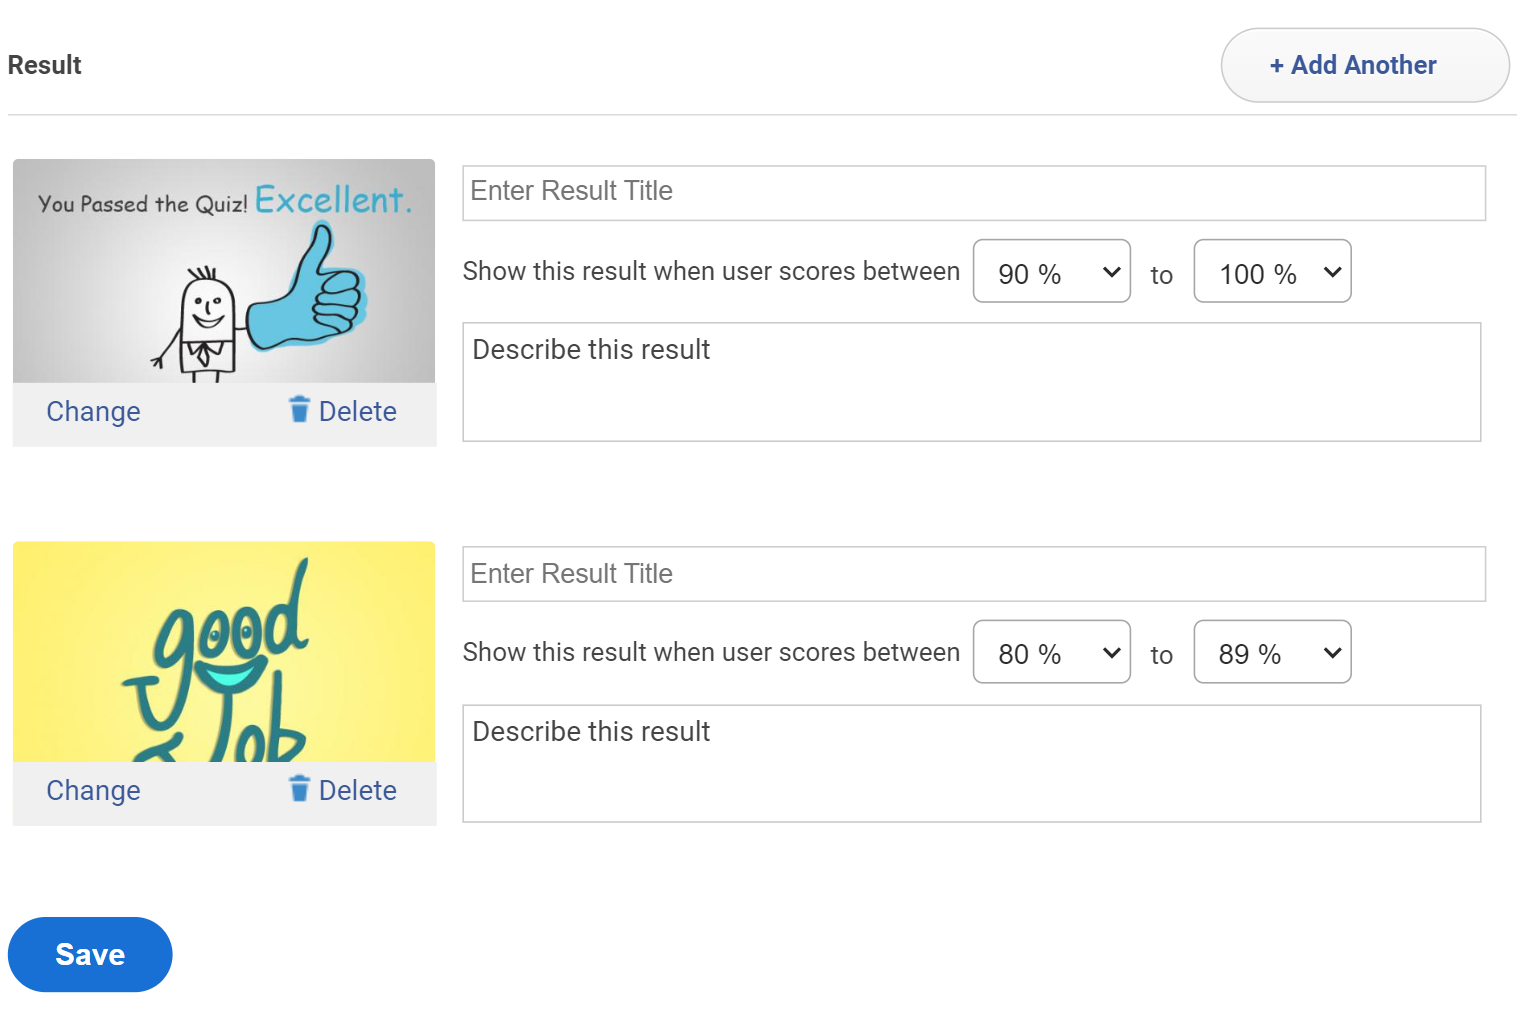
If you want to customize the results page, you can add a description in the following window and add an image, give it a title, add a description, and more.
Step 5: Configure Anti-Cheating & Security Settings
One of the major challenges traditional testing poses is the scope of cheating. But you can prevent it when creating online tests. For this, you can do the following:
- Randomize the order of questions, so everyone gets a different set of questions
- Shuffle answer options, making it difficult to copy answers
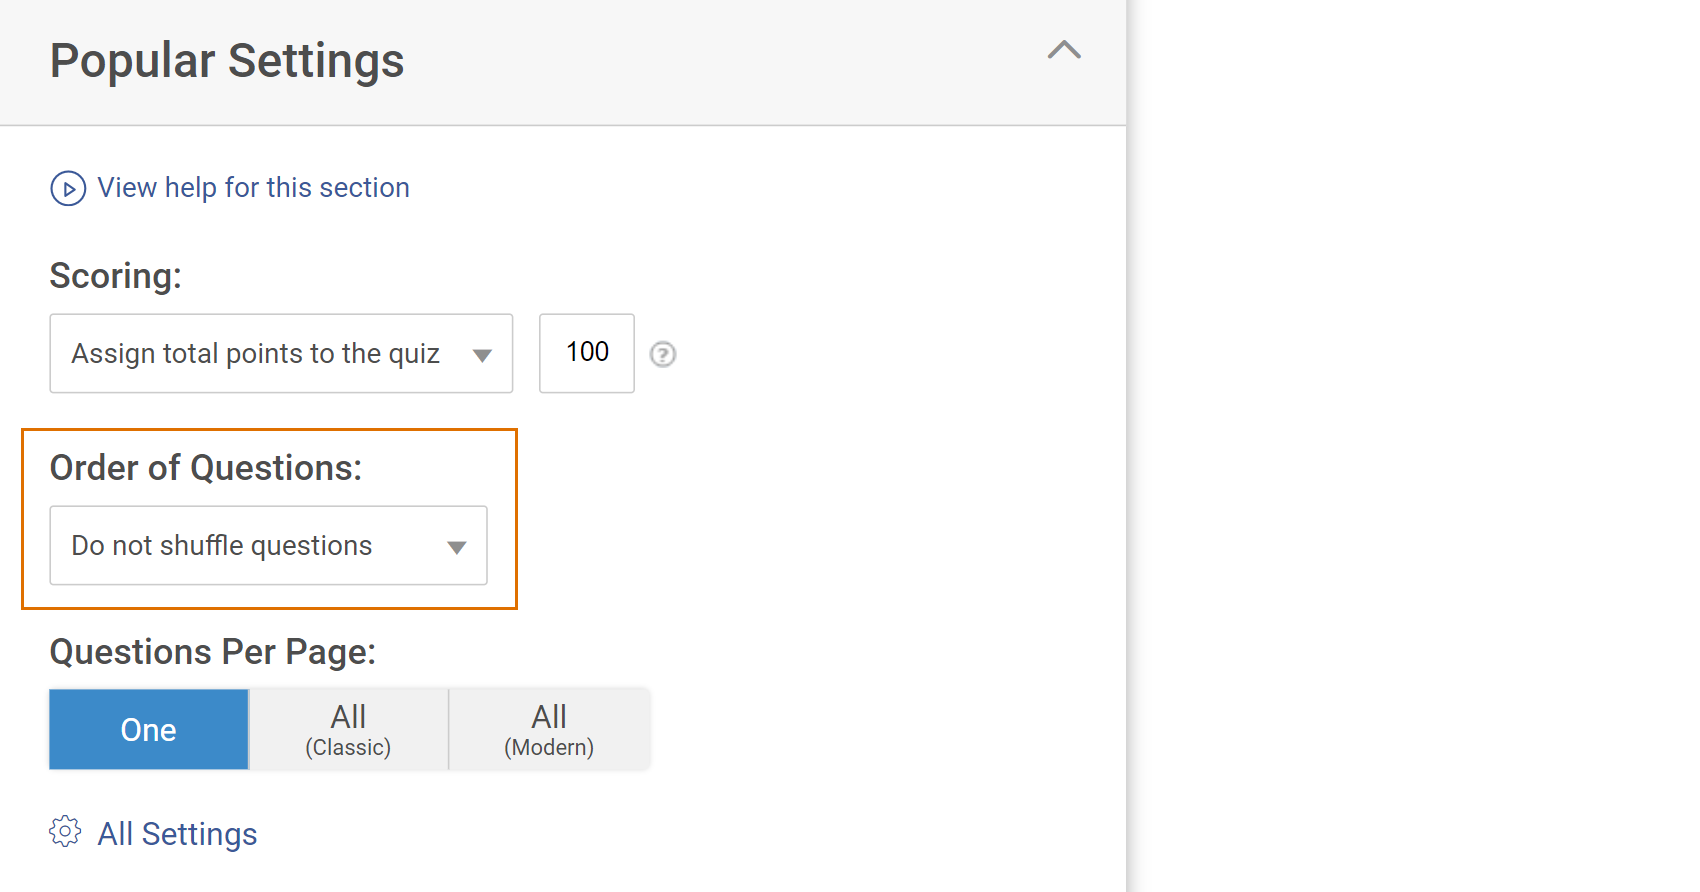
Go to Popular Settings on the left side of your interface, click Order of Questions, and select Shuffle questions & answers from the dropdown menu.
You can also protect your tests with a password under Quiz Security.
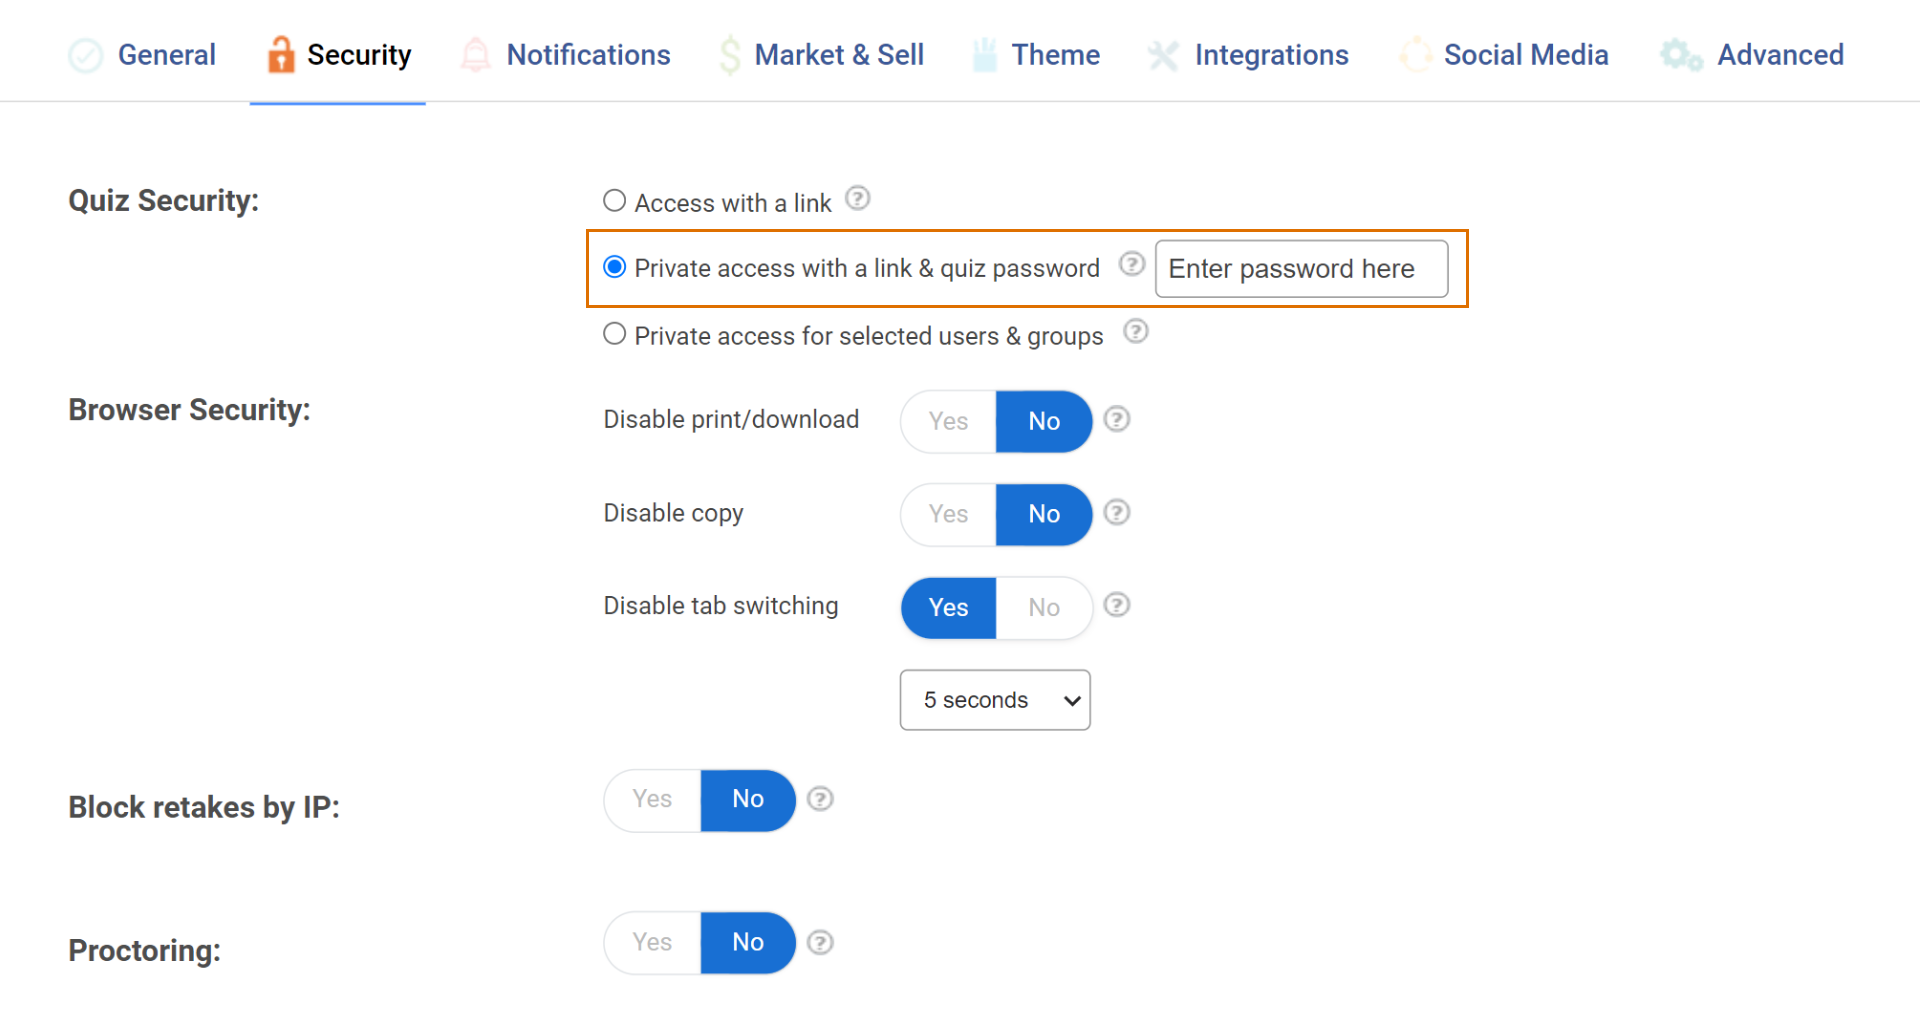
Configuring these settings is the best way to prevent cheating and unauthorized access. Additionally, you can configure other settings like quiz availability, notifications, integrations, and social media. Once you’re done configuring, click Save, and your test is ready.
With these steps, you can easily create online tests in no time.
For more on securing your tests, read this help article: How to Enable Cheating Prevention Features in a Quiz
That’s all about creating an online test using a cloud quiz-making tool. In the next section, let’s look at some of the best practices you can follow to create a perfect online test.
Related Read: How to Prevent Cheating in Online Exams & Tests: 20 Incredible Hacks
Prerequisites for Creating Online Tests
Before you embark on the journey of creating impactful online tests, ensure you have the following in place:
1. Clear Learning Objectives: Define the specific knowledge or skills you want to assess through your test. This will guide your question selection and ensure alignment with your overall learning goals.
2. Robust Test Maker Software: Choose a user-friendly, reliable, and robust online test maker that meets your requirements. Consider features like question types, customization options, automated grading, and reporting capabilities.
3. Well-Structured Content: Organize the material you intend to cover in your test, ensuring clarity and coherence. This will facilitate the creation of relevant and meaningful questions.
4. Time for Review and Refinement: Allocate sufficient time to thoroughly review your test before launching it. Check for accuracy, clarity, and proper formatting to ensure a smooth and error-free experience for test-takers.
Features of a Successful Online Test
To maximize the effectiveness of your assessments, incorporate these key features when you create a test paper online:
Clear Instructions: Provide concise and unambiguous instructions at the beginning of the test and for each section or question type, ensuring that learners understand what is expected of them.
Appropriate Difficulty Level: Design questions that challenge learners without being overly complex or frustrating. Tailor the difficulty to the target audience and learning objectives.
Randomized Question Order: Present questions in a random sequence to minimize the potential for cheating or collaboration.
Time Limits (if applicable): Set reasonable time limits for the entire test or individual sections, depending on the complexity of the content and the desired assessment goals.
Immediate Feedback (optional): Provide instant feedback on individual questions or at the end of the test to enhance the learning experience and reinforce understanding.
Accessibility Features: Ensure your test is accessible to learners with disabilities by providing alternative formats, adjusting font sizes, or offering screen reader compatibility.
Detailed Reports and Analytics: Utilize reporting features to track individual and group performance, identify knowledge gaps, and evaluate the effectiveness of your test.
When you create online tests with an online test maker, the reports and stats are generated automatically. You can easily view, download, or share this data.
With these reports, you can view learners’ names and email addresses, ‘total scores’ of learners, ‘time taken to complete a test, learners’ answers to each question, time spent per question report, etc. These reports help you determine the knowledge gaps, question difficulty level, the average time to complete a quiz, and more.
Watch: How to Review Quiz Reports & Statistics
15 Golden Rules for Creating Perfect Online Tests
Now that you know the standard steps, just follow these golden rules or best practices to create online tests on any topic that your learners will love. Let’s unpack them one after another.
Rule #1: Create Online Tests With Online Exam Software
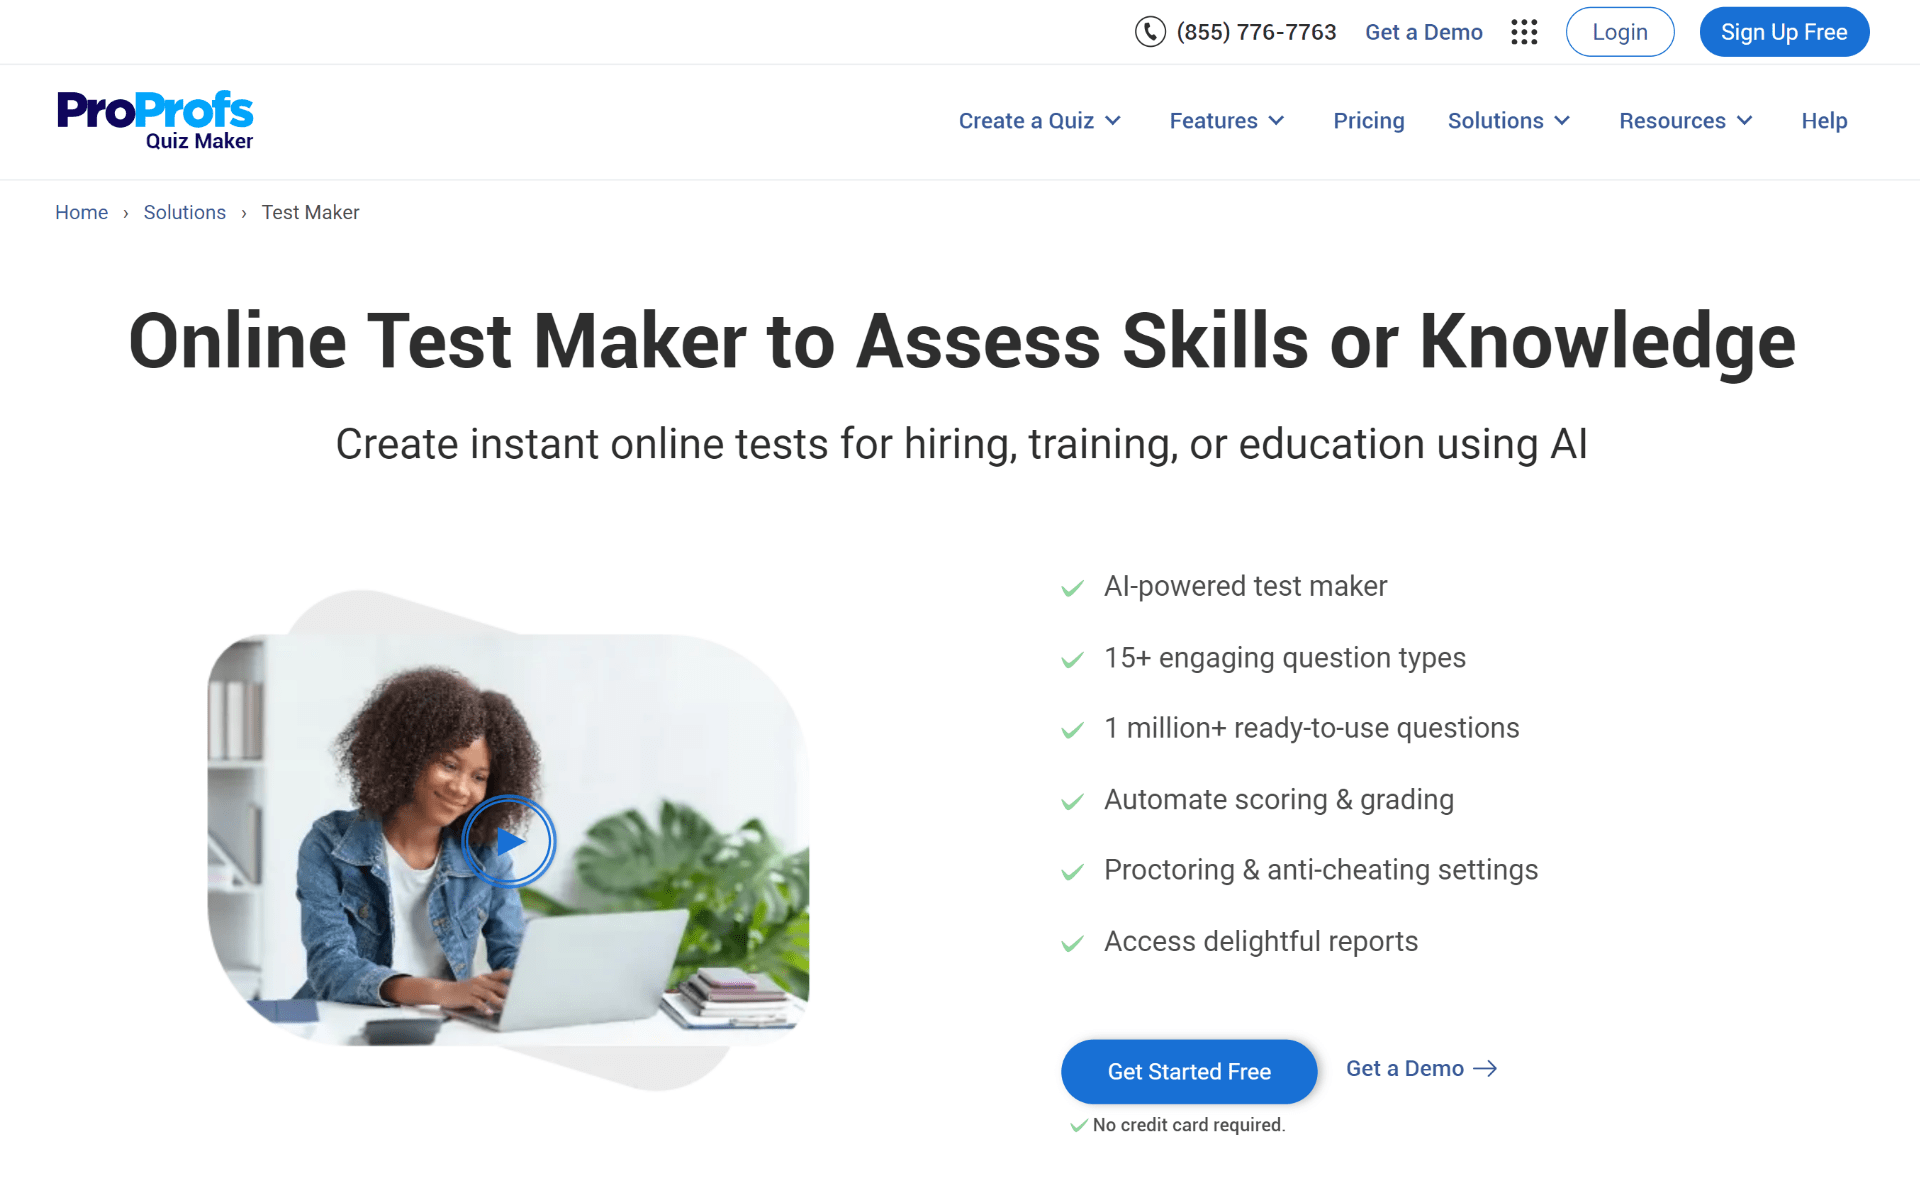
Using test creator software or exam maker software to create online tests can go in your favor in so many ways. It’s a tool to help you show your creativity at every stage of the process, like adding questions, designing quizzes, configuring, and many other elements.
Rule #2: Find & Use Pre-Made Templates & Questions
Often while creating tests, instructors and teachers end up spending hours deciding the right questions to add. Even though it’s not much work, it does take plenty of time.
A smarter way is to use professionally designed templates and ready-to-use questions.
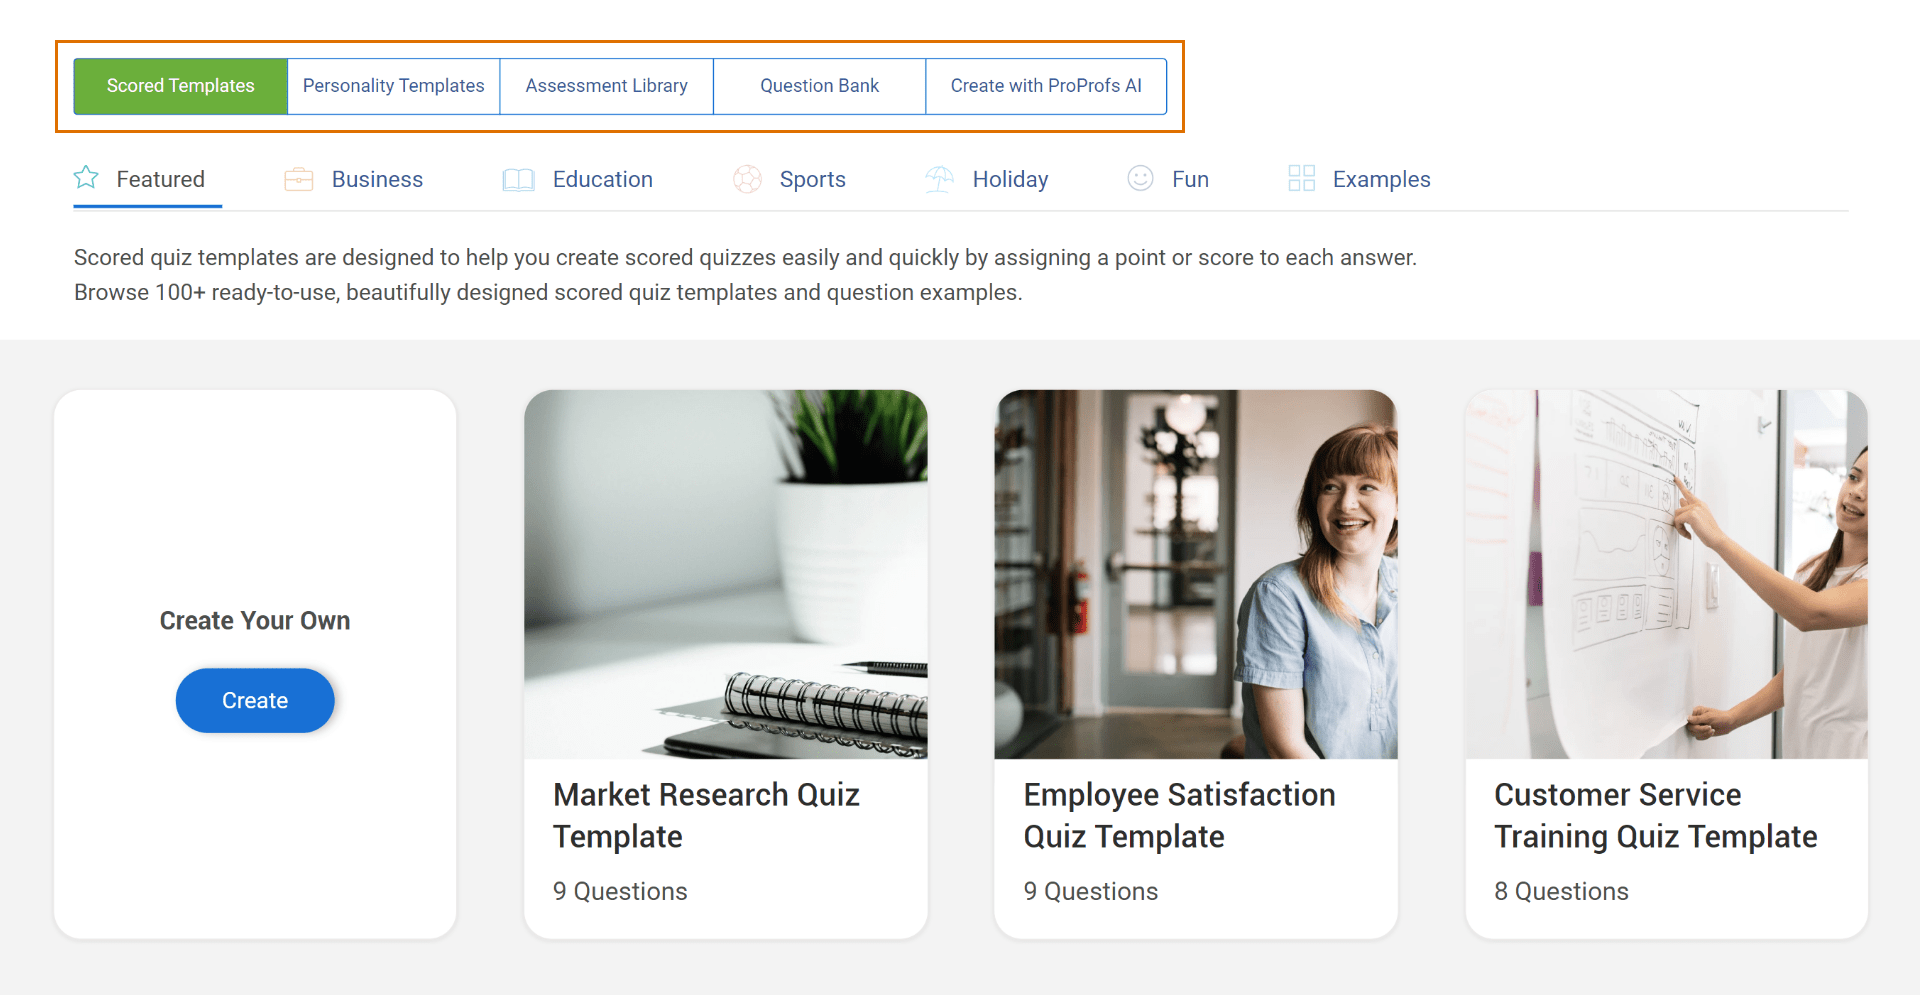
Choose any suitable template and edit it quickly to launch your test in minutes. For example, ProProfs offers 100+ scored quiz templates under different categories that you can use to build your tests.
Similarly, you can access ready-to-use questions from the question bank. It’s a smarter and more efficient way to build online tests as it cuts down the time by many hours. For instance, there are at least 100k+ questions on thousands of topics in the ProProfs question bank that you can use.
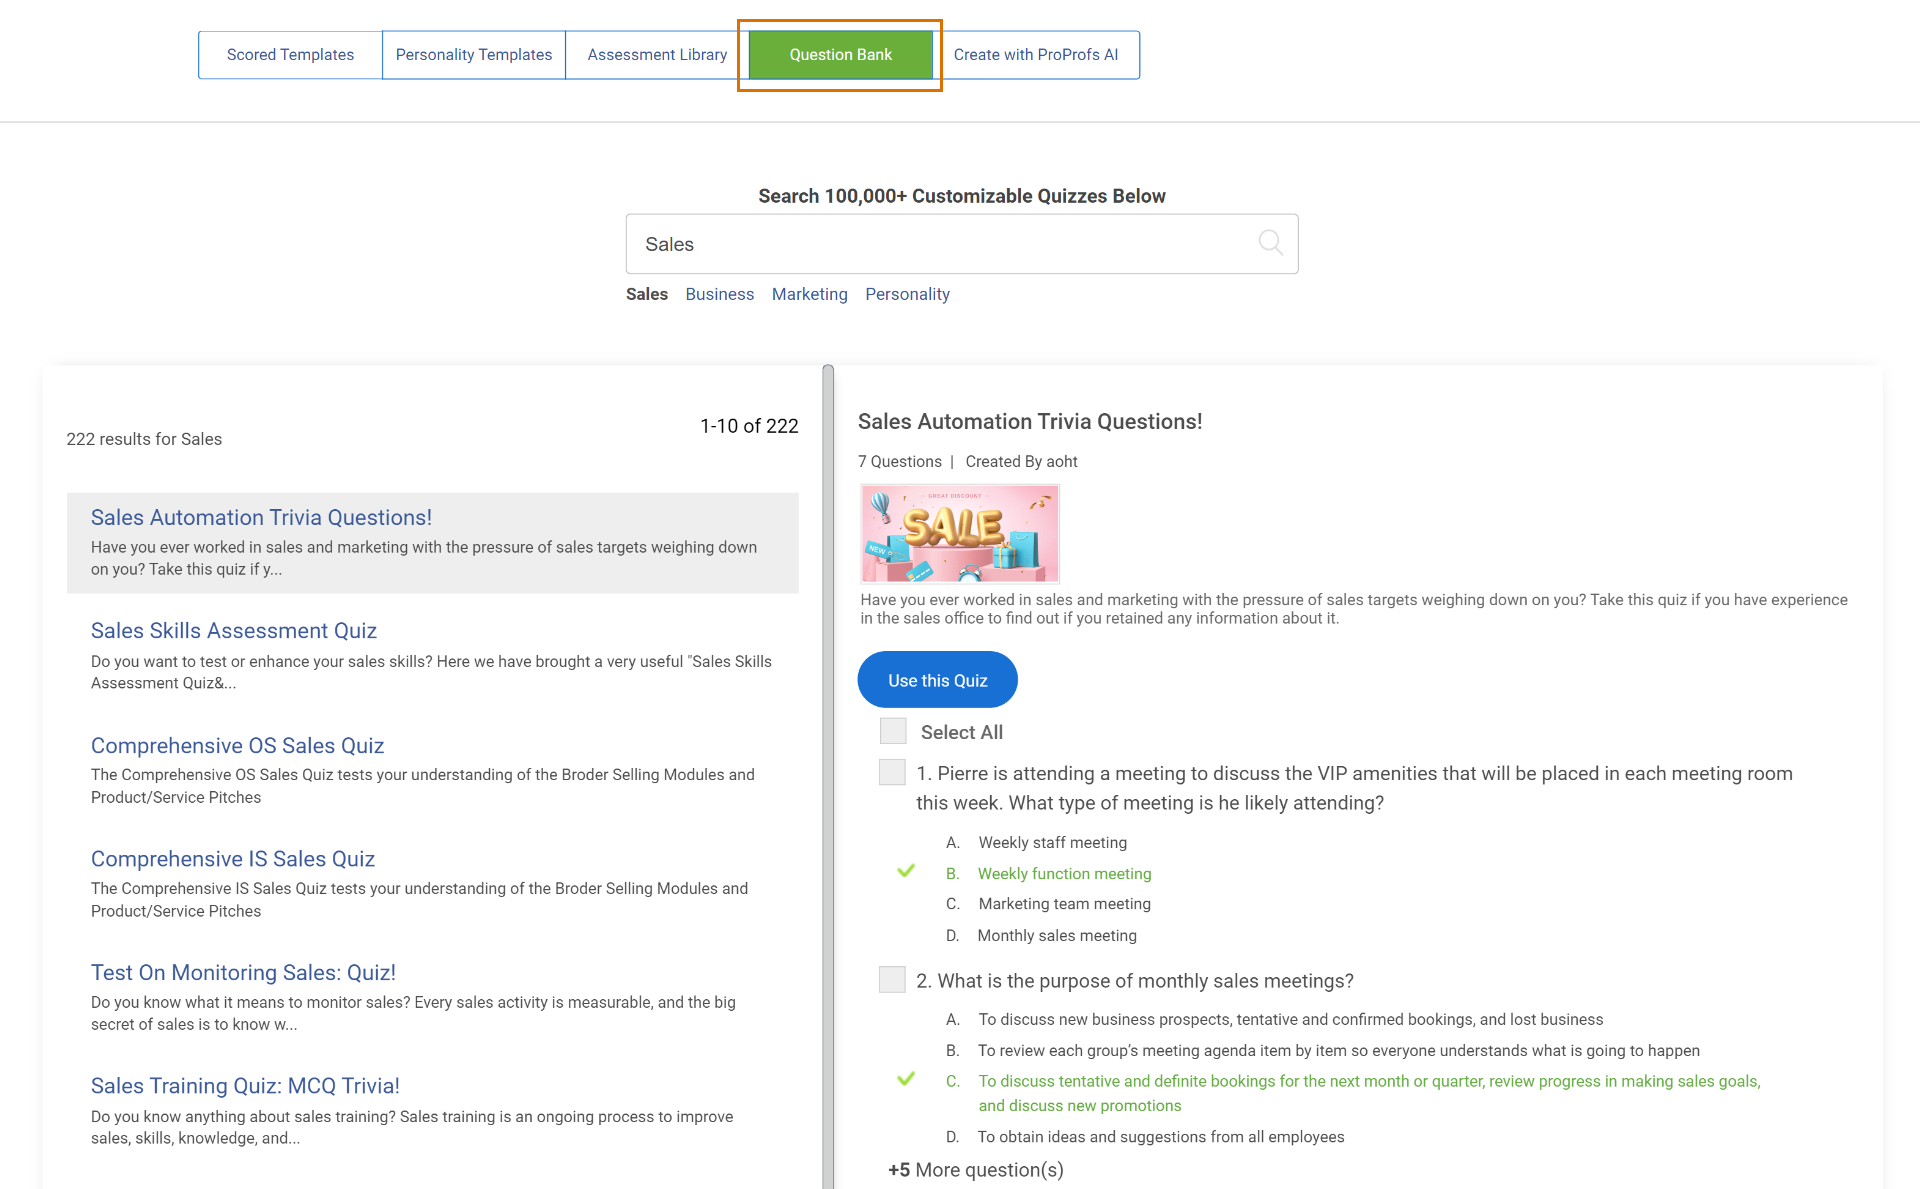
Watch: How To Create A Quiz Using Question Bank & Templates
Rule #3: Use Different Question Styles
One of the best practices with test questions is to use various types of questions like you would ask on a paper-based test. They include multiple-choice, true/false, and short answer/essay. Go for a robust test maker that supports these question types.
Here are some examples of the different types of questions you can use in your online tests:
Multiple-Choice
True or False
Essay
Matching
Mixing and matching different question types makes the tests interesting, and learners don’t lose interest anytime soon. So, this is something you should keep in mind when you create online tests for employees or students.
Rule #4: Group a Similar Set of Questions
Put questions on the same topic in a group or those with the same directions in a group. By doing so, you’ll be able to enhance the readability when you create a test online.
For example:
- Questions on global warming can be grouped in a section.
- Questions with the same directions as “True or False” or “Fill-in-the-blanks” can be grouped together.
Rule #5: Make Your Questions Interesting
To implement this rule, along with writing engaging quiz questions, you can do the following:
Adding relevant images within questions and answer options will make an online exam or test engaging for learners. You can directly upload an image from your local system or search the web for free stock images.
Adding images to a test not only magnifies learning experiences but also helps the test-takers remember the correct answer for a longer time.
Here’s an example of an identification question created by adding an image to the question:
What is this fish?
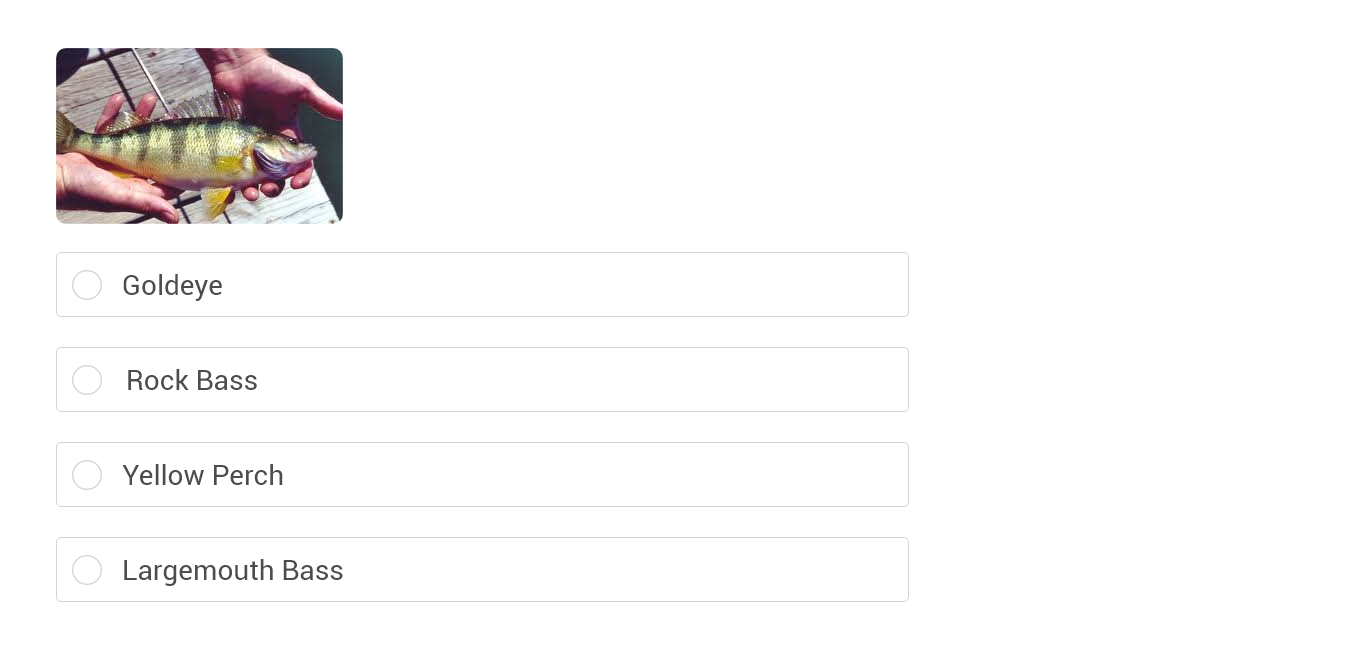
With an easy test maker comes the opportunity to create different types of questions. For example, it’s impossible to add a video to a paper exam. But you can always add audio or a video in an online test.
Here’s an example of a video question:

In an audio question, the learners first listen to the audio and then answer the questions that follow.
By adding a video or audio track to your questions, you can create questions like “Identify the animal in this video” or “Which Prime Minister’s voice has been captured in this audio?”
Creating such types of questions will make your test engaging and fun.
Rule #6: Check the Accuracy of Questions
Before finalizing the questions and moving ahead, you should always check the accuracy of the questions. To ensure all the questions added to your test are apt and correct, tick the following points off:
✔ There’s only one right answer, and all other answers are incorrect. Leave no room for confusion.
✔ Arrange answer options in numerical, alphabetical, or sequential order.
✔ All answer choices are grammatically or otherwise consistent so that no learner might (correctly or incorrectly) assume that it cannot be the correct answer option.
Rule #7: Configure Security Settings to Prevent Cheating
Configure security in online tests just like you’d do for a paper-based test to ensure that learners don’t cheat. You can:
- Randomize Questions
Change the order of questions so that learners sitting next to each other would not have the same questions.
- Shuffle Answer Options
For multiple-choice questions, you can shuffle the answer option so that the options, such as A, B, C, and D, are not always in the same order when a question is presented. That way, no one can take an answer key from another learner.
- Put a Time Limit
You can put a limit on the entire test or certain questions so that learners only have the time to finish a test and not enough time to look up answers on the internet or elsewhere. This will enable you to enforce fair practices for quiz takers and preserve the standards you’ve set for your assessments.
Rule #8: Automate Grading
Assign scores and grades to correct answers while creating questions in a test. These grades will be automatically assigned each time a learner gives the correct answer.
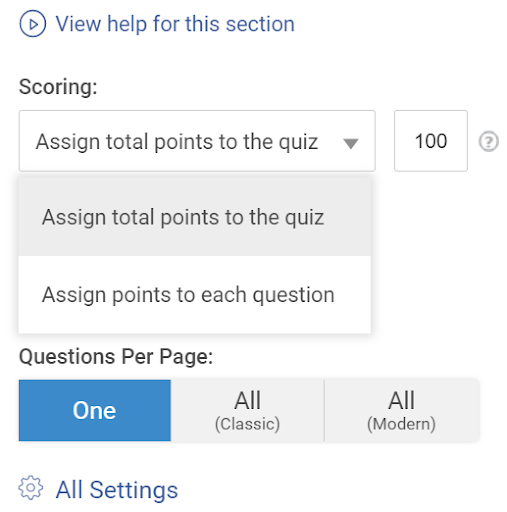
Automated grading or scoring for questions will save you time from grading each answer manually. This grading system works best for question types like fill-in-the-blanks, true or false, and multiple-choice.
Rule #9. Add Instant Feedback to Answers
Provide learners with instant feedback (explanations) based on their answers. Providing instant feedback for each answer will help learners practice and attain mastery over a topic.
The feedback is displayed to learners as soon as they answer a question.
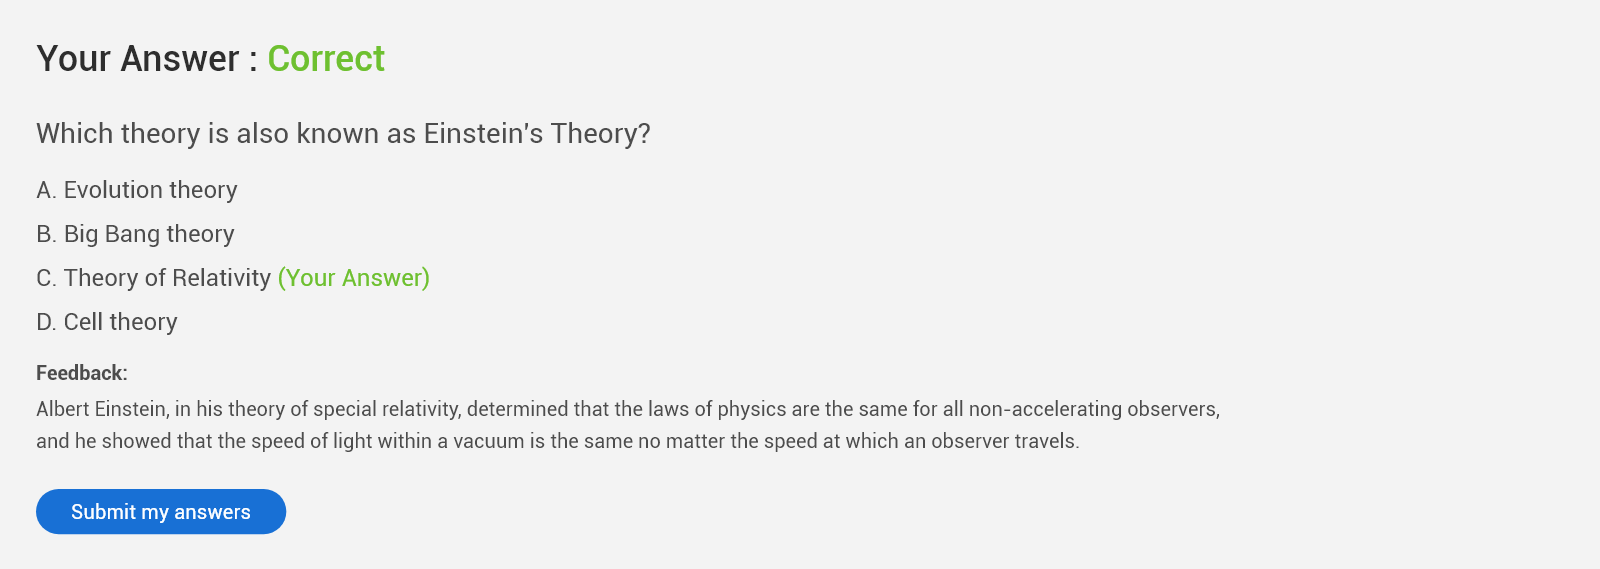
You can add three types of instant feedback in a test:
- Single feedback for all answers
- Feedback for every correct as well as incorrect answer
- Feedback for each answer option
Rule #10: Personalize Your Tests
Give your tests a unique personality. Personalize your online tests as and how you like them. If the standard layout and appearance of an online test is not as per your preference, edit the test and make some custom changes to make it more attractive to test takers.
Experiment with your logo, color schemes, or background images to personalize your tests. See what fits best, and go for it!
For example, while creating a test about healthy food habits, go for a background image showing healthy food options. It helps give a personality to tests, and they appear more attractive.

Rule #11: Customize the Test Results
A superior test generator software lets you decide how to display test results to your learners.
So, when you create tests in an online test maker, you can customize test results based on learners’ scores or grades like “good work,” “excellent work, keep it up,” “revise & attempt again,” etc. These will be displayed to the learners at the end of their quizzes.
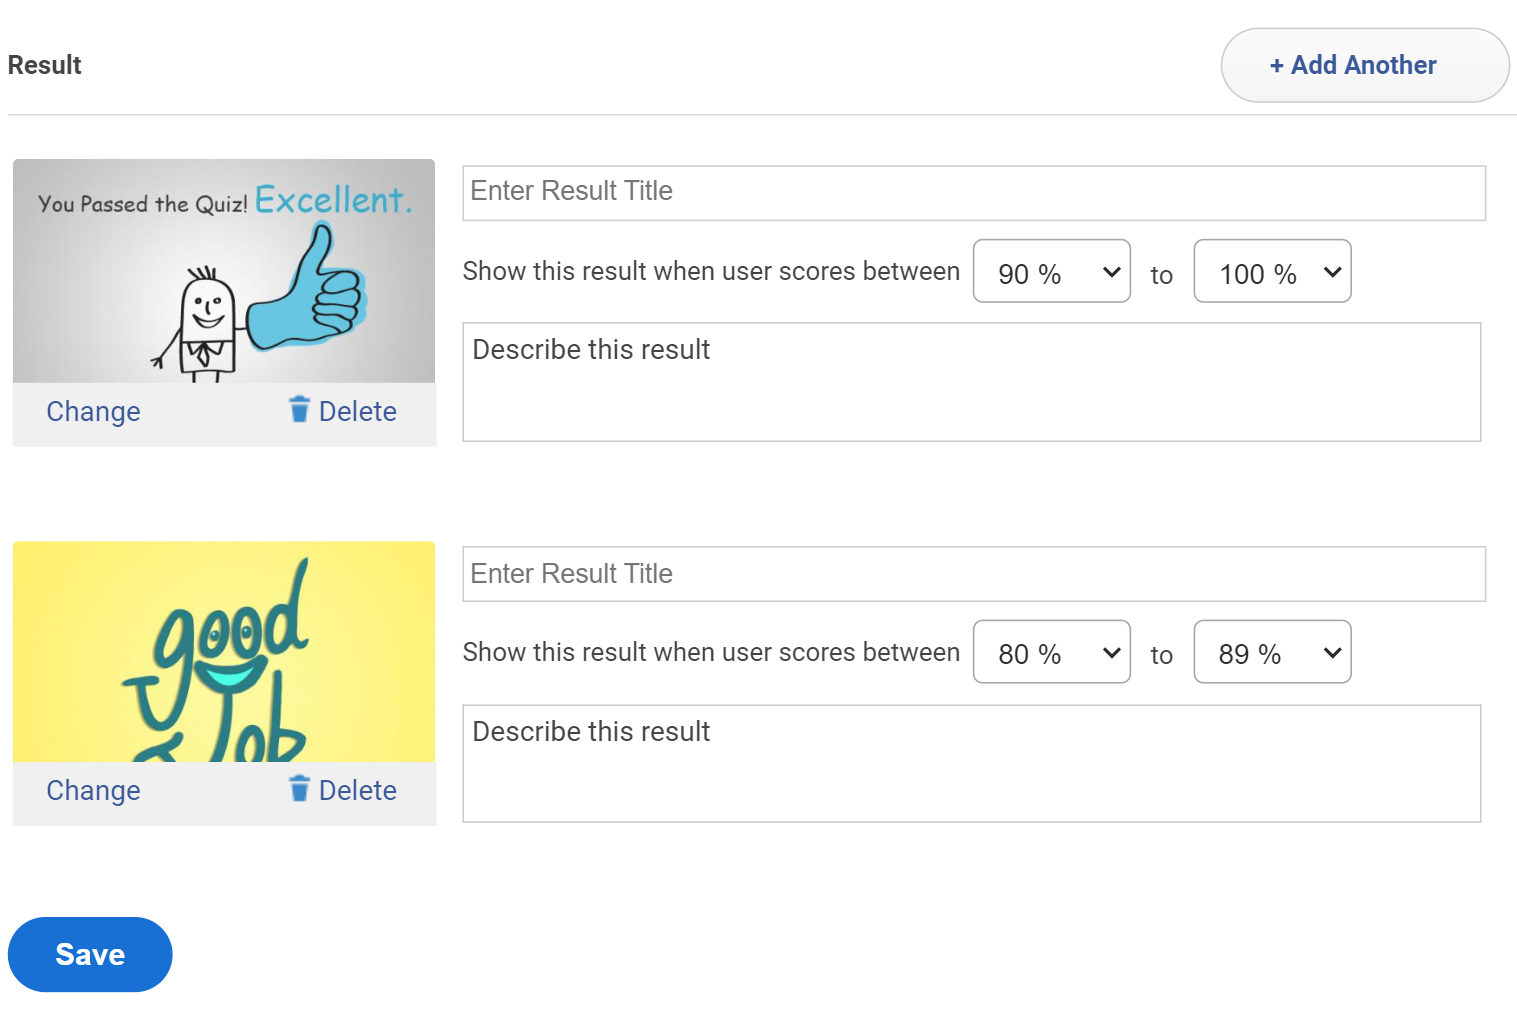
You can even choose what part of the learners’ report you want to be displayed, like the total number of correct/incorrect answers and the time taken to complete a quiz.
Rule #12: Secure Your Test With a Password
Protect your online tests with a password to prevent unauthorized access. Create a private link so that only authorized learners with their unique login credentials can access the tests.
Rule #13: Review Settings Before Sharing
Once you’re done creating your test, never forget to go back and review all the settings. There might be something you missed or some additional changes you want to make. Reviewing your settings will give you an opportunity to ensure there are no shortcomings in your tests.
Rule #14: Share Secured Tests
Once you’ve reviewed all the settings, especially the security settings, share your tests via email, share in a group (online classroom), or simply add tests online by embedding them into your website.
But make sure your tests are password-protected to avoid unauthorized access.
Rule #15: Access Automated Reports & Stats
When you create online tests with an online test maker, the reports and stats are generated automatically.
You can easily view, download, or share this data.
With these reports, you can view learners’ names and email addresses, ‘total scores’ of learners, ‘time taken to complete a test, learners’ answers to each question, time spent per question report, etc.
Here’s an example of a grade book report generated by ProProfs Online Test Maker:
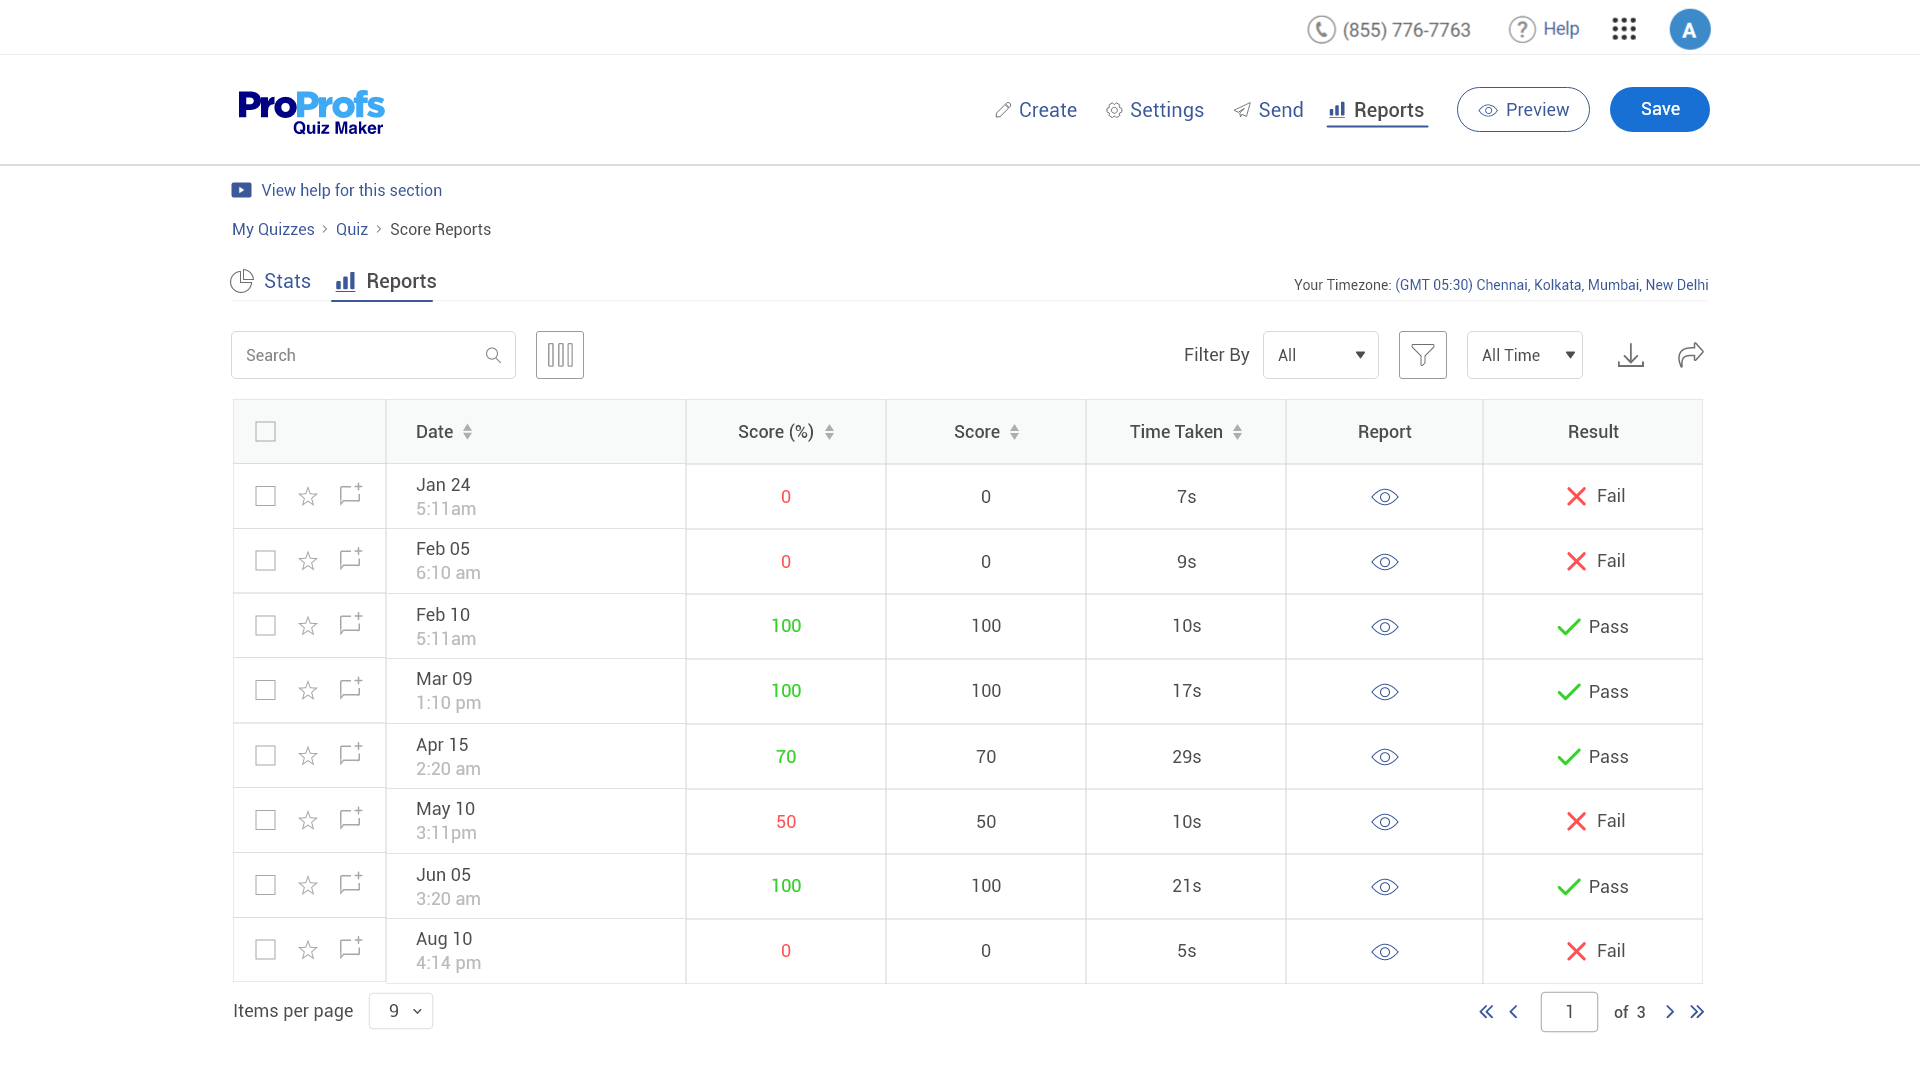
These reports will help you determine the knowledge gaps, question difficulty level, the average time to complete a quiz, and more.
These best practices will help you polish your online test-building skills. And do remember to find a good online test maker software that fits your needs.
You can find them online as quiz software, student assessment software, online quiz maker, online quiz generator, and other similar terms.
Now that you’re familiar with the golden rules for creating online tests, go ahead and start creating perfect ones.
For that you’ll need the right kind of test maker tool. Let’s find out how to choose the best solution to create online tests for students or any other audience type.
Watch: How to Choose the Best Quiz Software
But before that, let’s look at a real-life example of how a university benefitted from creating practice tests online for exam preparation.
Online Test Creation Case Study: Full Sail University
It’s a premier media arts institution in Winter Park, Florida, offering 40+ degree programs. Its courses are designed around real-world industry experience and creative problem-solving.
Problem It Encountered: The university needed training materials that could be accessed repeatedly and on-demand, regardless of what degree program or course the students were currently enrolled in. This was intended to help its students prepare for the software certification exam.
Solution It Adopted: It deployed a cloud-based quiz-making tool and created practice tests modeled after the actual certification exam. The practice tests were super easy to build using the application. The university could set the same parameters as the actual certification test, including a question bank, time limit, and minimum passing grade.
The internal online testing software that it previously used didn’t offer the functionalities that the new solution did.
Result It Got: The practice tests created using the quiz maker were hands down the best resource made available to the university. It achieved a near 100% success rate, with students passing the actual certification exam.
How Is an Online Test Software Useful for You?
An online test maker simplifies the entire learning process for students and teachers by giving a better overview, helping address all learning styles, and saving time & effort. It also provides ease of certification and can work across multiple types of devices. Let’s understand these points in detail to get a better idea:
Gives a Better Overview
The best part of using a test maker is that it gives a better overview of questions. This is helpful because when students look at a long list of questions, they easily become overwhelmed. This increases the probability of them skipping questions to which they do not know the answers.
To prevent that, you can show just one question at a time. You can also set a reminder for the questions that the learners skip. This will help students attempt all questions and learn from their mistakes.
Helps Address All Learning Styles
Different learners exhibit different learning styles. Some are visual learners, some are auditory learners, and others are kinesthetic learners.
Multiple-choice questions, fill-in-the-blanks, hotspot questions, image-based questions, and audio and video questions cater to the different preferences of learners and hold their attention till the end.
When you use a single type of question in your test, it might not be possible for you to address different learning styles. But, when you use an online test maker or software, you can use mixed question types and address different learning styles.
Saves Time & Effort
Manually grading test papers and individually sharing feedback for answers is extremely time-consuming and laborious for teachers. Also, there are high chances of mistakes in this method of evaluation.
With an online test maker, however, teachers can simplify the process. They can automate grading by pre-assigning scores to questions. So, when a learner answers a question correctly, the system recognizes it and grades automatically.
All they need to do is feed the answers when creating online tests. This way, learners get instant results and the time to focus on their improvement areas immediately.
Works Across Devices
Online tests created with an online test maker perfectly fit the screen size of tablets, laptops, and smartphones.
So you don’t have to bug your learners to take the tests strictly on a PC at a fixed time. You can simply set a date and time for test availability and let your learners attempt it at their convenience.
Helps with Engagement & Better Knowledge Retention
Expecting your students to complete academic quizzes without a motivating element like completion certificates isn’t a good strategy. Every student needs a reason to complete an online test. In fact studies show that the knowledge retention improved as a result of rewarding the brain.
Knowing that a reward is waiting for them at the end of a quiz will encourage them to give their best shot at it. That’s why you should choose a quiz maker with a certification feature.
How to Select the Best Online Test Maker
The best test-making tool should be easy to use, with options to create different types of tests, have automated grading & feedback as well as smart tracking & reporting features. It should also have multiple settings and configurations for you to create the tests the way you want. Now let’s have a look at these in detail:
Easy to Use
Ideally, the software you choose should be user-friendly. It won’t achieve widespread adoption if there’s a steep learning curve and long setup time. The lesser the hassles, the better the software.
Options to Create Different Types of Tests
This is non-negotiable for teachers. Nobody wants to limit themselves to one testing type; it’s unviable for comprehensive assessments. So, the solution you choose should enable you to create different types of tests that address different learning styles. This will improve learning and retention.
Automated Grading & Feedback
Grading, scoring, and feedback are vital elements in any learning assessment.
That’s why the tool you choose should support these functionalities through automation to save you time and effort.
It’ll increase the efficiency of online tests as the test results of hundreds or even thousands of learners are automatically graded, and feedback is delivered instantly.
Smart Tracking & Reporting
Coming to another essential feature, real-time tracking and actionable reports should be available in the test maker software you choose. Ask yourself – what good is using software if you have to prepare the reports yourself?
Tools that let you track your learners’ progress in real-time and generate detailed reports after a test is complete are advisable. You should be able to view all your learners’ activities like when they took a test, how much time they took to complete a test, at what question they dropped the test, the number of wrong attempts they made, and more.
Settings & Configurations
Make sure the software application you’re considering lets you configure the necessary settings like enabling password protection, setting a time limit to tests, enabling notifications, randomizing questions, disabling tab switching, and more.
Watch: this video guide to understand: How to Choose the Best Test Generator
Create Online Tests Just the Way You Want Them!
Whether for academic or corporate hiring & training purposes, online tests make the easiest and most effective form of assessment. They are quick, time and labor-saving, and customizable according to your evaluation plans.
To leverage the full benefits of such tests, you should deploy the right online test maker and follow the best practices. Only then can you streamline your test creation, administration, tracking, & analysis tasks to offer impactful learning experiences to your audience.
While purchasing a test maker, consider all the key features and their corresponding benefits. It’s best to go for a test drive or request a demo with as many of these tools as possible before you take the plunge.
FREE. All Features. FOREVER!
Try our Forever FREE account with all premium features!


